Picking
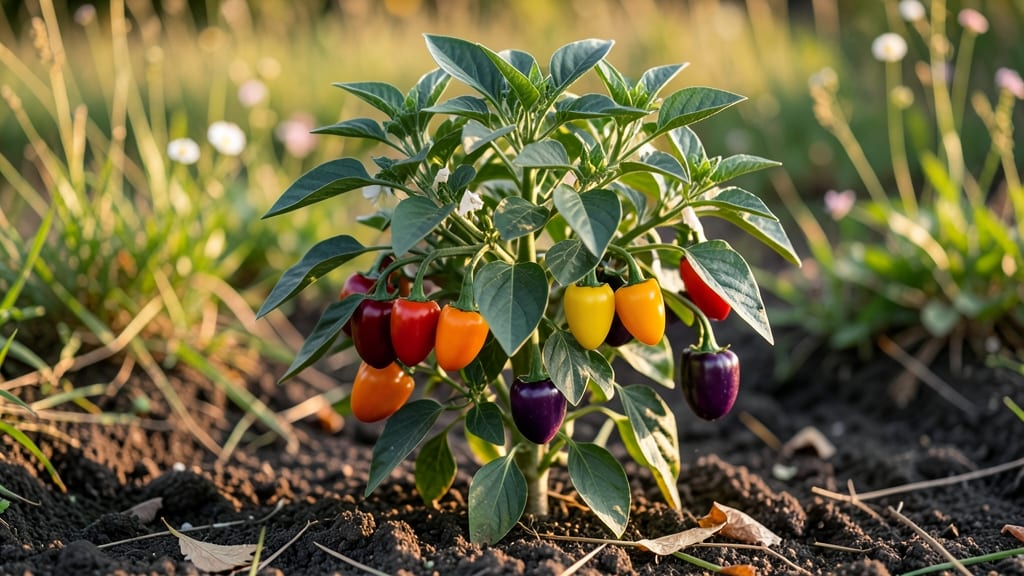
"A small peppers name like Thai bird’s eye or sweet shishito might sound unassuming, but these fiery or mild varieties steal the show—whether in stir-fries or as disappearing plate favorites. 🌶️ From container gardens to backyard beds, their tiny plants deliver outsized flavor. while delivering serious taste.
They’re the perfect gateway for beginners or space-challenged gardeners. The best part? Most stay under 2 feet tall, making them ideal for balconies, windowsills, or small plots.
Thai bird’s eye peppers bring fiery heat, shishito peppers offer mild sweetness with a surprise mild kick, and banana peppers deliver crisp, tangy crunch. All three grow quickly—60-90 days to harvest—and love warm weather with 6+ hours of sunlight daily.
You’ll end up with peppers so productive you’ll wonder why you ever bought them at the store. Fresh from the vine, they’re sweeter, crunchier, and way more satisfying than anything in a jar. Plus, their compact size means fewer pests and easier care—just water consistently and watch them grow.
Whether you’re growing in 5-gallon pots or a sunny garden corner, these varieties make pepper gardening foolproof. Ready to start? Here’s how to pick the perfect one for your space and taste.
📚 In This Guide
- What you need
- Instructions
- Tips and common mistakes
- Wrapping up and next steps
What you need
- ● Small Pepper Seeds or Seedlings: Choose from mini varieties like Thai Chili "Bird’s Eye," Shishito, Apache, or Snack Pepper. Quantity: 3–5 seeds per container or 1–2 seedlings per 12-inch pot.
- ● Containers or Garden Space: Containers: 12–18 inch pots with drainage holes (1–2 plants per pot). Garden Beds: Full sun (6+ hours/day) and well-draining soil.
- ● Potting Mix: 1–2 bags of high-quality, well-draining mix (e.g., Miracle-Gro Potting Soil).
- ● Fertilizer: Balanced, water-soluble fertilizer (e.g., 10-10-10) or organic options like compost.
- ● Watering Can or Hose: With a gentle spray nozzle for seedlings.
- ○ Gloves (Optional but Recommended): To protect hands from spicy peppers!
- ● Trowel or Transplant Spade: For digging holes or repotting.
- ● Mulch: Straw or shredded leaves to retain moisture.
- ● Stakes or Trellis: For vining varieties like Snack Pepper.
- ● pH Testing Kit: To ensure soil pH is 6.0–6.8 (ideal for peppers).
- ● Spray Bottle: For misting seedlings if humidity is low.
How to select and grow compact pepper varieties in containers
Here’s how to transform tiny spaces into a pepper paradise with varieties perfect for pots and small gardens.
🌱 Step 1: Choose the Right Mini Pepper Varieties
Not all peppers are created equal—compact varieties stay small without sacrificing flavor. Look for bush types like 'Tiny Tim', 'Thunderbird', or 'Lunchbox' peppers, which max out at 12-18 inches tall. These are bred for containers but thrive in garden beds too. Avoid indeterminate varieties like jalapeños or bell peppers, which sprawl and need staking.
Check seed packets for days to maturity—most mini peppers ripen in 60-75 days, perfect for short growing seasons. I always pick heat-tolerant varieties like 'Shishito' or 'Pepperoncini' for my balcony, as they handle afternoon sun better than larger types. Start with 4 plants to ensure a steady harvest, since mini peppers produce smaller yields per plant.
☀️ Step 2: Position for Maximum Sun and Heat
Mini peppers crave full sun—at least 6-8 hours daily—but they’ll tolerate partial shade in scorching climates if given afternoon relief. In containers, place pots on a south- or west-facing deck or balcony. If growing in the ground, choose a spot sheltered from strong winds, which can stress delicate stems.
Here’s the trick: warmer soil speeds up germination. Use black plastic mulch or a heat mat to keep soil temps above 65°F until seedlings emerge. I’ve found that 5-gallon fabric pots retain heat better than ceramic, helping roots establish faster in cooler springs. Monitor soil temperature with a soil thermometer—peppers won’t thrive below 60°F.
💧 Step 3: Water Deeply and Maintain Consistent Moisture
Mini peppers hate soggy roots but also wilting. Water deeply 2-3 times weekly until top 2 inches of soil feel dry. Use a moisture meter or stick your finger in—the soil should feel like a wrung-out sponge. Overwatering causes blossom-end rot, while underwatering stunts fruit production. I water in the early morning to reduce evaporation and fungal risks.
For containers, self-watering pots are a game-changer—they keep moisture steady without drowning roots. If using standard pots, add 1 inch of perlite to the potting mix to improve drainage. Mulch with straw to lock in moisture and keep roots cool. Watch for yellowing leaves, a sign of overwatering, or drooping plants, a cry for hydration.
✂️ Step 4: Prune and Support for Bountiful Harvests
Compact peppers benefit from light pruning to encourage bushier growth. Pinch off the first few flowers if your plant looks leggy—this redirects energy to stronger stems. Once established, remove suckers (the shoots that form in the leaf axils) to prevent overcrowding. I use soft pruners to avoid damaging stems, and I always sterilize them with rubbing alcohol between cuts.
Even mini varieties need support. Cage or trellis peppers when they hit 6 inches tall to prevent sprawling. I use 5-foot tomato cages cut to half-height—they’re sturdy but don’t overwhelm the plant. Harvest peppers when fully colored but still firm. Regular picking encourages more production, so check plants every 3-4 days during peak season.
🌿 Step 5: Extend the Season with Simple Tricks
Mini peppers are early finishers, but you can prolong harvests with a few tweaks. Black plastic mulch warms soil in spring, giving peppers a 2-week head start. In fall, row covers or cold frames protect plants from frost until first light freeze. I’ve kept 'Shishito' peppers producing until November in Zone 7 by using a mini greenhouse on my patio.
For indoor growing, move potted peppers to a sunny window or under grow lights (12-14 hours daily) when temps drop below 50°F. Expect slower growth indoors, but with supplemental light, you’ll still get a modest harvest. Store extra peppers in the fridge for up to 2 weeks or freeze them whole for later cooking.
Tips & tricks for perfect mini pepper growth
Transforming your tiny space into a pepper powerhouse starts with these game-changing insights that'll make all the difference in your harvest.
Variety Selection Strategy: When choosing your 4 plants from compact varieties like 'Tiny Tim' or 'Thunderbird', pay special attention to the 60-75 day maturity range—this is your golden window for container growing. I've found that 'Shishito' and 'Pepperoncini' varieties handle container life exceptionally well because they're naturally more compact and heat-tolerant. Their bushy growth habit means you won't need to worry about sprawling like you would with larger varieties.
Container Material Matters: The 5-gallon fabric pots mentioned in Step 2 are my absolute favorite for mini peppers because they allow for better air circulation around roots while retaining just the right amount of moisture. I've seen dramatic differences in growth when comparing fabric pots to ceramic—they stay warmer longer, especially important when maintaining that critical 65°F soil temperature for germination. Pro tip: Drill a few extra drainage holes in the bottom if you're using plastic containers to prevent waterlogging.
Light Optimization: While the instructions mention 6-8 hours of daily sun, I've discovered that mini peppers actually benefit from a little afternoon shade in hot climates. Position your containers to catch that morning sun (when it's less intense) and provide afternoon relief. For indoor growing, supplement with 12-14 hours of grow lights—I use LED grow bulbs that mimic natural sunlight spectrum, which makes a noticeable difference in plant health and pepper production.
Pruning Precision: When it comes to that light pruning in Step 4, I've learned to be particularly vigilant about removing suckers—they're those little shoots that form in the leaf axils. These energy vampires can divert precious nutrients from your pepper production. I make it a habit to check my plants every 3-4 days during peak season (right when you should be harvesting) and remove any suckers I find. This simple maintenance keeps your plants focused on producing those delicious mini peppers instead of putting energy into unwanted growth.
Pro Tips for Small Peppers Name
- Transforming your tiny space into a pepper powerhouse starts with these game-changing insights that'll make all the difference in your harvest.
- Variety Selection Strategy: When choosing your 4 plants from compact varieties like 'Tiny Tim' or 'Thunderbird', pay special attention to the 60-75 day maturity range—this is your golden window for container growing.
- I've seen dramatic differences in growth when comparing fabric pots to ceramic—they stay warmer longer, especially important when maintaining that critical 65°F soil temperature for germination.
Frequently asked questions
Got questions about tiny but mighty peppers? You’re not alone! Here are some of the most common queries about small pepper varieties—whether you're growing them in containers, gardens, or just curious about their names and uses.
What are the best small pepper varieties for beginners?
Start with Thai Bird’s Eye, Shishito, or Snack Pepper—they’re easy to grow, productive, and perfect for containers. These varieties are forgiving, disease-resistant, and deliver big flavor in tiny packages!
How do I know if my small pepper plant is healthy?
Healthy plants have vibrant green leaves, sturdy stems, and no yellowing or wilting. Check for pests (like aphids) on the undersides of leaves and ensure they’re getting 6+ hours of sunlight daily. Overwatering is a common issue—let soil dry slightly between waterings!
When should I harvest small peppers for the best flavor?
Harvest green peppers when firm and glossy (about 2–3 inches long), or wait for red/orange ripening for sweeter, more complex flavors. Pinch off peppers early to encourage more production. Use clean scissors or pruners to avoid damaging the plant!
Can I grow small peppers in pots, and what size container do I need?
Yes! Most small varieties thrive in 5-gallon containers or larger (at least 12–18 inches deep). Ensure pots have drainage holes and use a well-draining potting mix. Dwarf varieties like Peperoncini or Mini Bell do well in smaller pots (3–5 gallons).
What’s the difference between “snack peppers” and “mini peppers”?
Snack peppers (like Snack Pepper) are sweet, crunchy, and eaten raw, while mini peppers (e.g., Thai Chili) are often spicy and used in cooking. Snack peppers are bred for size (1–3 inches), while mini peppers prioritize heat or flavor profiles. Try both for versatility!
Why are my small pepper plants not producing fruit?
Common culprits: lack of sunlight, overcrowding, or nutrient deficiencies (try a balanced fertilizer). Peppers also need warmth (70°F+) and consistent watering. Prune excess leaves to improve airflow and pollination—hand-pollinate if needed by gently shaking plants!
Wrapping up and next steps
From shishito peppers to piquín and beyond, small peppers bring big flavor to gardens and containers—without the bulk! Whether you’re a space-conscious urban gardener or a spice enthusiast, these tiny varieties pack heat, color, and versatility. 🌱✨
Ready to grow your own? Start by picking one or two varieties that suit your taste and space, then dive into planting. Your next harvest could be just a few weeks away!
- Pro tip: Share your favorite small pepper with a friend—growing together makes it even more fun! 🌶️💬