Vegetables
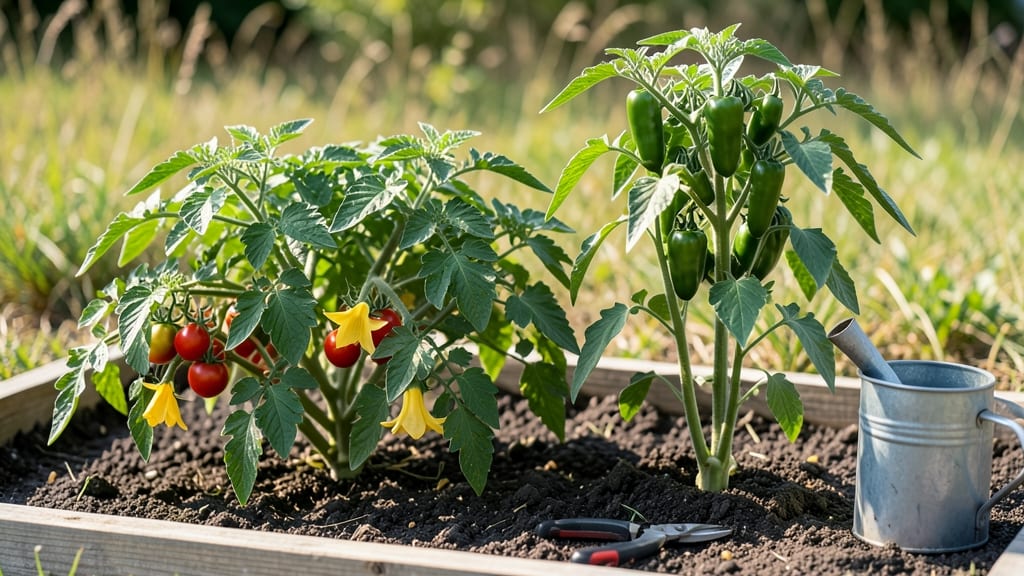
Growing tomatoes and peppers together saves space and creates a dynamic duo in your garden. 🌱 I’ve learned that their complementary needs—tomatoes’ thirst and peppers’ heat tolerance—make them perfect partners when planted just right. The key?
Starting indoors 8–10 weeks before your last frost, then transplanting after soil warms to 60°F. Both thrive in full sun (6–8 hours daily) and well-draining soil with compost mixed in.
Tomatoes need stakes or cages to support their weight, while peppers stay compact but benefit from a light mulch to retain moisture. Water deeply at the base—never overhead—to prevent disease, and fertilize every 3–4 weeks with a balanced organic feed.
By mid-summer, you’ll harvest juicy tomatoes and spicy peppers simultaneously, with flavors peaking when picked at their ripest. The real magic? Their shared pest deterrents—basil between rows keeps aphids away, while marigolds repel beetles for both plants.
Works in zones 5–10, with adjustments for shorter seasons (use black plastic mulch to warm soil faster). Here’s how to time it perfectly for your climate—no more missed harvests!
📚 In This Guide
- What you need
- Instructions
- Tips and common mistakes
- Wrapping up and next steps
What you need
- ● Tomato Seeds or Seedlings: Determinate (bush) or indeterminate varieties (e.g., Roma, Cherry, Early Girl) – 4-6 plants (or 1-2 per person in a family).
- ● Heat-tolerant varieties if in a hot climate (e.g., Solar Fire, Heatmaster).
- ● Pepper Seeds or Seedlings: Bell peppers, jalapeños, or habaneros – 3-5 plants (mix of varieties for flavor and color).
- ● Start indoors 8-10 weeks before last frost or buy transplants.
- ● Potting Soil: 10-15 lbs of high-quality, well-draining potting mix (e.g., Miracle-Gro or Fox Farm Ocean Forest).
- ● Containers or Garden Beds: For containers: 5-gallon pots or larger (tomatoes need deep roots; peppers thrive in 1-gallon pots minimum).
- ● For in-ground: Full sun (6-8+ hours/day) and loose, fertile soil with pH 6.0-6.8.
- ● Fertilizer: Balanced fertilizer (e.g., 10-10-10) or tomato/pepper-specific fertilizer (follow package rates).
- ● Compost or worm castings (1-2 cups per plant) for organic enrichment.
- ● Mulch: 2-3 inches of straw, wood chips, or black plastic (to retain moisture and suppress weeds).
- ● Stakes or Cages: For tomatoes: 6-foot stakes or cages (indeterminate varieties need support).
- ○ For peppers: Optional small cages or trellises (if growing tall varieties).
- ● Basic Gardening Tools: Trowel or transplant spade.
- ● Gloves (to protect hands from thorns or soil).
- ● Watering can or hose with a gentle spray nozzle.
- ● Heat-Zone Knowledge: Check your USDA Hardiness Zone (e.g., Zone 5-10 for tomatoes; peppers thrive in Zones 9-11 but can be grown in cooler zones with care).
- ● Last frost date in your area (critical for planting timing!).
- ○ Optional (But Helpful!) Extras: Pruning shears (for tomato maintenance).
- ● Row covers or shade cloth (for cooler climates or hot summers).
- ● pH test kit (to monitor soil acidity).
- ● Drip irrigation system (for consistent moisture).
Step-by-step planting calendar for tomatoes and peppers by heat Zone
Timing is everything—here’s how to align your planting with your local climate for maximum yield.
📅 Step 1: Determine Your Heat Zone and Last Frost Date
First, identify your USDA heat zone (1-11) and locate your last average frost date in spring and first frost date in fall. I use the USDA Plant Hardiness Zone Map to pinpoint my zone—this dictates when to start seeds indoors and when to transplant outdoors. For example, Zone 7 (where I garden) has a last frost around April 15, while Zone 10 rarely sees frost.
Write these dates on your calendar. Tomatoes and peppers are frost-sensitive, so you’ll need to time planting so they mature before cold snaps. Peppers, especially, take 90-120 days to fruit, while tomatoes range from 60-90 days depending on variety. Use these dates to work backward from your first frost.
🌱 Step 2: Start Seeds Indoors Based on Your Zone
Begin tomato and pepper seeds indoors 6-8 weeks before your last frost date—this gives them enough time to develop strong roots before transplanting. Use sterile seed-starting mix in 2-3 inch deep containers to prevent damping-off. Keep seeds in a warm spot (75-85°F) under grow lights for 14-16 hours daily—natural light alone won’t cut it.
Watch for first true leaves (not the initial cotyledons) to appear in 7-14 days. Once seedlings have 2-3 sets of true leaves, they’re ready to harden off. I like to use a seedling heat mat for the first 2 weeks to speed germination, especially in cooler zones. If your zone is 8 or higher, you can direct-sow outdoors 2-3 weeks after last frost—just cover seedlings with row fabric at night for the first week.
☀️ Step 3: Transplant Outdoors When Soil and Air Warm Up
Transplant seedlings 2-3 weeks after your last frost date when soil temperatures reach at least 60°F. Use a soil thermometer to check—cool soil slows root growth and invites disease. Tomatoes need full sun (6-8 hours daily), while peppers thrive in hotter conditions (8+ hours). Space tomatoes 18-24 inches apart and peppers 12-18 inches apart—crowding reduces airflow and increases blight risk.
Hardening off is critical: Gradually expose seedlings to outdoor conditions over 7-10 days before transplanting. Start with 1-2 hours of shade, then increase sun exposure daily. You’ll know they’re ready when they look plump and vibrant, not wilted. Plant in the late afternoon to reduce transplant shock—roots recover better in cooler evening temps.
⏰ Step 4: Adjust Care Based on Your Zone’s Summer Heat
In zones 1-5, focus on mulching (2-3 inches of straw or shredded leaves) to retain moisture and regulate soil temperature. In zones 6-9, shade cloth (30-50%) protects peppers from midday sun (above 90°F) that can scorch fruit. Tomatoes in zones 10-11 may need afternoon shade to prevent sunscald—watch for white or yellow patches on exposed sides.
Peppers in hot zones benefit from drip irrigation to keep foliage dry and prevent fungal diseases. I water deeply every 2-3 days in summer, aiming for 1 inch of water per week. Tomatoes, however, need consistent moisture—let the top 1-2 inches of soil dry between waterings to prevent cracking. Use a moisture meter to avoid guesswork.
🍅 Step 5: Plan for Fall Harvests in Warmer Zones
In zones 7-11, extend the season by planting heat-tolerant varieties (like ‘Celebrity’ tomatoes or ‘Jalapeño’ peppers) 8-10 weeks before your first frost. Succession plant every 2 weeks through summer for continuous harvests. In cooler zones (1-6), focus on short-season varieties (like ‘Stupice’ tomatoes or ‘Banana’ peppers) and use row covers to protect plants until frost.
Watch for color changes on fruit—ripe tomatoes turn deep red (or their variety’s color), while peppers develop full color and firmness. Harvest regularly to encourage more production. In zones with short growing seasons, pull up plants 2-3 weeks before frost and hang them in a cool, dry place to ripen indoors. This trick adds 2-4 weeks to your harvest window.
Tips & tricks for heat-Zone-specific tomato and pepper planting
Getting your timing right with tomatoes and peppers means the difference between a thriving garden and a disappointing harvest. Here's what I've learned from years of trial and error—and how to avoid the most common pitfalls.
Heat Zone Precision: Don't just guess your zone—use the USDA map to pinpoint it exactly. I've seen gardeners in Zone 7a plant too early because they thought they were in Zone 6, only to lose their pepper plants to late frost. The 10-15°F difference between zones can shift your planting window by weeks. For example, if you're on the border between Zone 6 and 7, lean toward the cooler zone's last frost date to be safe with frost-sensitive peppers.
Seed Starting Strategy: The 6-8 week indoor starting window is your golden opportunity, but don't rush it. I've found that using a seedling heat mat for the first 2 weeks (as mentioned) speeds germination, but only if you maintain that 75-85°F warmth consistently. Set up a small fan on low to create airflow—this prevents damping-off disease, which can wipe out seedlings in days. And here's a pro move: label your seed trays with the variety name and planting date so you don't mix up your heirlooms and hybrids later.
Soil Temperature Reality Check: That "at least 60°F" soil temperature isn't just arbitrary—it's when roots actually start growing. I learned this the hard way when my Zone 5 garden had 65°F soil but my tomatoes still struggled. Invest in a soil thermometer ($15 well spent) and test it at the depth of your transplants' roots (about 4-6 inches down). If it's below 60°F, wait it out—cool soil invites rot and stunts growth. For peppers, which are even more sensitive, aim for 70°F soil if possible.
Hardening Off Hack: The 7-10 day hardening off period can feel tedious, but I've perfected a shortcut that works beautifully. Start by placing seedlings in a sheltered spot (like under a patio cover) during the day and bringing them in at night. After 3 days, gradually increase their outdoor time while providing afternoon shade. By day 5, they should be outside all day if temperatures are above 50°F. The key visual cue? Healthy seedlings should look plump and vibrant—not wilted or leggy. If they're struggling, they're not ready yet.
Pro Tips for Tomato And Peppers
- Getting your timing right with tomatoes and peppers means the difference between a thriving garden and a disappointing harvest.
- Heat Zone Precision: Don't just guess your zone—use the USDA map to pinpoint it exactly.
- Seed Starting Strategy: The 6-8 week indoor starting window is your golden opportunity, but don't rush it.
Frequently asked questions
Got questions about growing tomatoes and peppers? You’re not alone! Here are answers to the most common queries—whether you’re a beginner or a seasoned gardener.
When is the best time to plant tomatoes and peppers in my heat zone?
Timing depends on your USDA heat zone and last frost date. For peppers, wait until soil is at least 60°F (15°C)—they’re frost-sensitive! Tomatoes thrive in 55–65°F (13–18°C) soil. Check your zone’s planting calendar (like this guide) for exact dates. Pro tip: Use row covers in cooler zones to extend the season!
Can I grow tomatoes and peppers together in the same garden bed?
They’re companion plants—peppers deter pests like aphids, while tomatoes boost soil nitrogen. Just space them 18–24 inches apart for airflow. Avoid planting near brassicas (kale, cabbage), which compete for nutrients. Bonus: Interplant with basil to repel flies and enhance flavor!
Why are my pepper plants turning yellow, and how do I fix it?
Yellowing leaves often signal overwatering, nutrient deficiency, or disease. Check soil moisture—peppers hate soggy roots! Fix it:
- Adjust watering (1–1.5 inches per week).
- Fertilize with balanced 10-10-10 or compost.
- Prune damaged leaves and improve drainage.
If spots appear, it may be early blight—remove affected leaves and apply copper fungicide.
How do I know when tomatoes and peppers are ripe for harvest?
Tomatoes: Color shifts from green to deep red, yellow, or purple (varies by type), and they yield slightly when gently squeezed. Peppers: Ripe when firm, glossy, and fully colored—red, orange, or green (depending on variety). Harvest tip: Pick peppers before frost to preserve flavor and prevent cracking!
What are good alternatives if my tomatoes or peppers fail to grow?
No stress! Try these low-maintenance swaps:
- Tomato alternatives: Eggplant, zucchini, or cherry tomatoes (faster-growing).
- Pepper alternatives: Shishito peppers, jalapeños, or hot banana peppers (more disease-resistant).
- Container-friendly: Patio tomatoes (like ‘Tiny Tim’) or ‘Jalapeño M’ peppers.
Or focus on herbs (basil, cilantro) or green onions—they’re forgiving and add flavor!
Wrapping up and next steps
Growing tomatoes and peppers is a rewarding journey that brings vibrant flavors and colors to your table—and your plate! 🌱 Whether you're a beginner or a seasoned gardener, the key is matching your plants to your heat zone and giving them the love they deserve.
With the right timing, soil, and care, you’ll soon be harvesting a bounty of fresh, homegrown goodness.
Ready to take the next step? Start small—plant a few seeds or seedlings this season, experiment with varieties, and let your green thumb grow! Before you know it, you’ll be swapping store-bought produce for your own delicious, sun-ripened harvest. Happy gardening! 🌿