
Planting
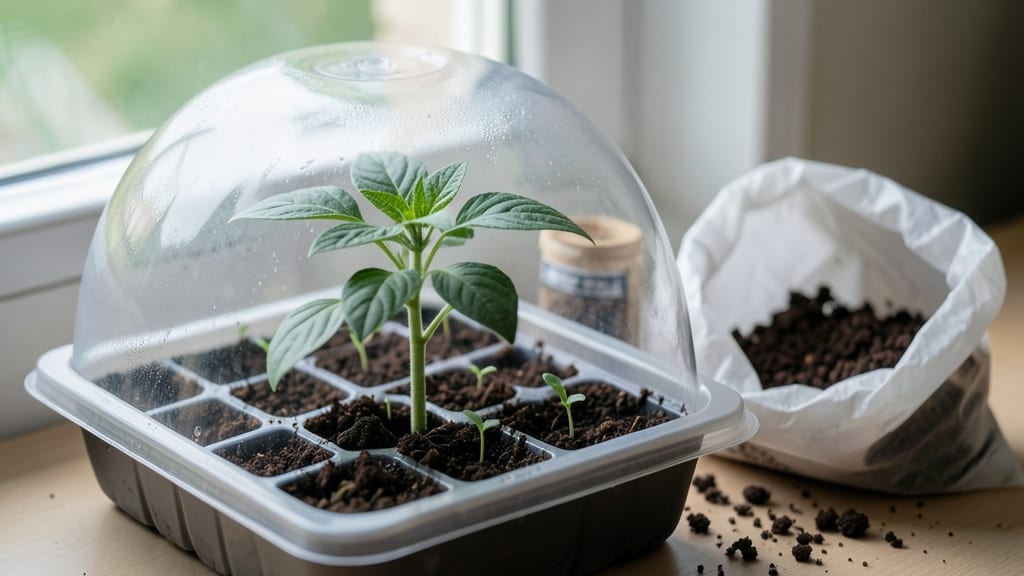
Planting pepper seeds indoors gives you a 3-4 week head start on the season—no more waiting for store-bought seedlings to catch up. 🌱 I learned the hard way that peppers need warmth and patience, but once you crack the germination code, you'll have stocky seedlings ready for transplant long before your neighbors even think about planting.
The secret isn't fancy equipment—just the right soil mix (light and airy), consistent moisture, and a warm spot (70-80°F). Too much water or cold soil leads to damping off, where seedlings collapse overnight.
I've lost batches to this, but now I use a heat mat and bottom-watering to keep things stable. By week 3, you'll see those first true leaves—dark green and sturdy, not the weak sprouts you get from rushed germination.
These plants will outperform store-bought seedlings because they're hardened off and ready to grow. Works for any pepper variety, from sweet bell peppers to spicy jalapeños. Here's how to get those seeds sprouting reliably every time.
📚 In This Guide
- What you need
- Instructions
- Tips and common mistakes
- Wrapping up and next steps
What you need
- ● Pepper seeds: Choose heirloom, hybrid, or organic seeds (e.g., jalapeño, bell, habanero). Start with 10–20 seeds for a small batch or 50+ seeds for a bigger harvest.
- ● Seed-starting trays or pots: Use biodegradable or plastic cell trays (2–4" deep) or small pots (3–4" diameter). Aim for 1 seed per cell/pot.
- ● Seed-starting mix: A lightweight, sterile mix (e.g., 50% peat moss + 50% perlite or vermiculite). Avoid garden soil—it’s too dense!
- ● Grow lights or sunny windowsill: Pepper seeds need 12–16 hours of light daily. A full-spectrum LED grow light (12–24W) works best if natural light is limited.
- ● Spray bottle with water: For gentle hydration—avoid overwatering!
- ○ Plastic wrap or humidity dome: Keeps moisture in while seeds germinate (optional but helpful for humidity-loving peppers).
- ○ Heat mat (optional but recommended): Peppers thrive at 75–85°F. A seedling heat mat speeds up germination if your home is cooler.
- ● Fertilizer: A balanced, water-soluble fertilizer (5-5-5 or 10-10-10) diluted to half-strength for young seedlings.
- ● pH test kit: Peppers prefer pH 6.0–6.8. Adjust soil if needed with lime (to raise pH) or sulfur (to lower pH).
- ● Label markers: Track varieties—peppers can look very similar at first!
- ● Grow tent or reflective tray: Maximizes light efficiency if space is tight.
- ● Fungicide (preventative): A copper-based or neem oil spray to ward off damping-off disease.
Step-by-step instructions for planting pepper seeds indoors
Here’s how I’ve learned to coax those stubborn pepper seeds into sprouting reliably—no more waiting weeks for stubborn germination.
🌱 Step 1: Prep Seeds for Faster Germination
Peppers germinate best when their outer coating softens first. Soak seeds in a bowl of lukewarm water for 12 hours—this mimics natural rainfall and speeds up sprouting by 3-5 days. I use a small mesh bag or paper towel to contain them while soaking, making it easy to transfer later without losing seeds.
After soaking, drain the water completely and let seeds air-dry for 10 minutes on a paper towel. This prevents mold while keeping the outer shell pliable. You’ll see a slight darkening of the seed coat—this is your signal they’re ready for planting. If you skip this step, germination can take 2-3 weeks instead of the 7-10 days we’re aiming for.
🪴 Step 2: Set Up Containers and Soil Mix
Fill 4-inch pots (one per seedling) with a sterile seed-starting mix—never garden soil, as it’s too dense and may harbor pathogens. I like to add 10% perlite to the mix for extra drainage, since peppers hate soggy roots. Moisten the soil until it’s damp but not dripping, then press it down gently to remove air pockets.
Peppers need warmth to germinate, so place your pots on a seedling heat mat set to 75-85°F. If you don’t have a heat mat, a sunny windowsill near a warm wall works in a pinch. The key is keeping the soil consistently warm—peppers won’t sprout if the soil dips below 65°F. You’ll know the setup is right when the soil feels warm to the touch, like a steaming cup of tea.
💧 Step 3: Plant Seeds at the Right Depth
Dig a hole ¼ inch deep—about the width of your pinky fingernail—and place 1-2 seeds in each pot. Cover them with a thin layer of soil, then mist the surface lightly with water until it’s evenly moist. Peppers need darkness to germinate, so don’t press the soil down too firmly—just enough to hold the seeds in place.
Cover the pots with clear plastic wrap or a humidity dome to trap warmth and moisture. Check daily for condensation on the plastic—this means the environment is humid enough. If you see mold forming, remove the cover for 30 minutes to let it dry out. Germination should begin in 5-7 days, but some varieties (like habaneros) may take up to 10 days. Patience is key here—don’t dig up seeds to check for sprouts too soon.
☀️ Step 4: Provide Light and Monitor Growth
Once seedlings emerge, remove the plastic cover immediately to prevent damping-off disease. Place them under a grow light or in the brightest window (south-facing if possible). Peppers need 14-16 hours of light daily—without enough, they’ll grow leggy and weak. You’ll know they’re getting the right light when the leaves are dark green and compact, not stretched out.
Water from the bottom by placing pots in ½ inch of water for 10 minutes—this keeps the soil evenly moist without disturbing the seedlings. Avoid overhead watering, as wet leaves encourage fungal issues. After 2-3 weeks, when seedlings have 2 sets of true leaves, thin to the strongest one per pot. The weakest will yellow and fall over on its own—no need to pull it.
⏰ Step 5: Harden Off Before Transplanting
Two weeks before your last frost date, start hardening off seedlings by placing them outside in a shaded, sheltered spot for 1-2 hours the first day. Gradually increase exposure by 1 hour daily, moving them to morning sun first to avoid scorching. Peppers are sensitive to cold, so never let temperatures drop below 50°F during this process.
You’ll know they’re ready for the garden when they’ve spent a full day outside without wilting. Transplant on an overcast afternoon to reduce shock, burying seedlings deeper than they grew in pots—this encourages stronger root systems. Water deeply after planting to settle the soil around the roots. With this method, you’ll have vigorous, disease-free pepper plants ready for the garden in just 6-8 weeks.
Tips & tricks for fast pepper seed germination
Here's what I learned after struggling with slow germination myself—these small tweaks make all the difference when you're chasing those fast sprouts.
Soaking Secret: For the 12-hour soak, I use a spray bottle to keep the water level consistent—never let seeds dry out during this process. If your water feels cool to the touch, warm it slightly (up to 85°F) to mimic natural conditions. The goal is to soften the seed coat without cooking the seeds. I also add a tiny pinch of honey (just a few drops) to the soaking water—it contains natural fungicides that prevent mold while the seeds hydrate. This extra step cuts germination time by another day or two.
Heat Mat Hack: If you don't have a seedling heat mat, repurpose an old aquarium heater designed for betta fish tanks—just set it to 75-85°F and place it under your pots. These heaters are inexpensive, precise, and perfect for maintaining consistent warmth. The key is keeping soil temps above 65°F at all times during germination. I test soil warmth by pressing my finger into it—it should feel like a warm bath, not cold. If your home tends to be chilly, this simple upgrade can be the difference between success and failure.
Lighting Strategy: For the critical 14-16 hours of light, I recommend using a full-spectrum LED grow light if possible—it mimics sunlight better than standard bulbs. Position it just 2-3 inches above seedlings after they sprout. If using a window, rotate pots daily so all sides get even light exposure. You'll notice seedlings growing toward the light source—this is normal until they develop their own structure. The moment you see leaves turning pale or stretching (called etiolation), it's time to adjust your light setup.
Hardening Off Shortcut: When hardening off seedlings, I start with just 1-2 hours in the shade on day one, then increase by 1 hour each subsequent day. The key is to do this gradually—peppers are sensitive to temperature swings. I also avoid hardening off on windy days, as even gentle breezes can stress young plants. You'll know your seedlings are ready for transplant when they've spent a full day outside without wilting. This process builds resilience that makes all the difference when moving them to the garden.
Pro Tips for Plant Pepper Seeds Indoors
- Here's what I learned after struggling with slow germination myself—these small tweaks make all the difference when you're chasing those fast sprouts.
- Soaking Secret: For the 12-hour soak, I use a spray bottle to keep the water level consistent—never let seeds dry out during this process.
- Heat Mat Hack: If you don't have a seedling heat mat, repurpose an old aquarium heater designed for betta fish tanks—just set it to 75-85°F and place it under your pots.
Frequently asked questions
Got questions about growing peppers from seeds indoors? You’re not alone! Here are answers to the most common concerns to help you get started with confidence.
How long does it take for pepper seeds to germinate indoors?
Most pepper seeds sprout within 7–21 days, depending on temperature and variety. Hot peppers (like jalapeños) often germinate faster (7–14 days), while larger varieties (like bell peppers) may take up to 3 weeks. Keep soil consistently warm (70–85°F) and moist to speed things up!
What if my pepper seeds aren’t sprouting after 3 weeks?
Don’t panic! Try these fixes:
- Check moisture: Seeds need consistent dampness—not soggy. Use a spray bottle to avoid overwatering.
- Test temperature: Place trays on a seedling heat mat (75–85°F) or near a sunny window.
- Verify viability: Soak seeds in warm water for 24 hours—if they float, they’re likely dead. Try fresh seeds!
Can I use regular potting soil for pepper seeds?
Yes, but amend it for better results! Pepper seeds thrive in a light, sterile mix. Combine:
- 50% seed-starting mix (or coco coir)
- 30% perlite or vermiculite (for drainage)
- 20% worm castings or compost (for nutrients)
When is the best time to start pepper seeds indoors?
Timing depends on your climate, but a general rule is to start 8–12 weeks before your last frost date. For most gardeners:
- Cool climates (Zones 1–5): Begin indoors in February–March.
- Warm climates (Zones 6–10): Start in late winter (January–February) or even outdoors in early spring.
What can I do if my seedlings look leggy or weak?
Leggy seedlings (tall, thin stems) mean they’re stretching for light. Fix it with:
- More light: Move trays within 2–3 inches of grow lights (12–16 hours/day) or to a south-facing window.
- Thinner spacing: Space seedlings 1–2 inches apart to reduce competition.
- Fertilizer boost: Use a balanced, water-soluble fertilizer (like 5-5-5) half-strength after true leaves appear.
Wrapping up and next steps
Planting pepper seeds indoors is a rewarding journey that starts with patience and the right techniques.
By following these steps—from selecting high-quality seeds to providing the perfect environment—you’ll give your peppers the best chance to sprout strong and healthy. Now that you’re ready to start, why not take the next step? Once your seedlings are thriving, transplant them outdoors (or keep them indoors with proper lighting) and watch your garden grow into a spicy, flavorful harvest! 🌱✨