Planting
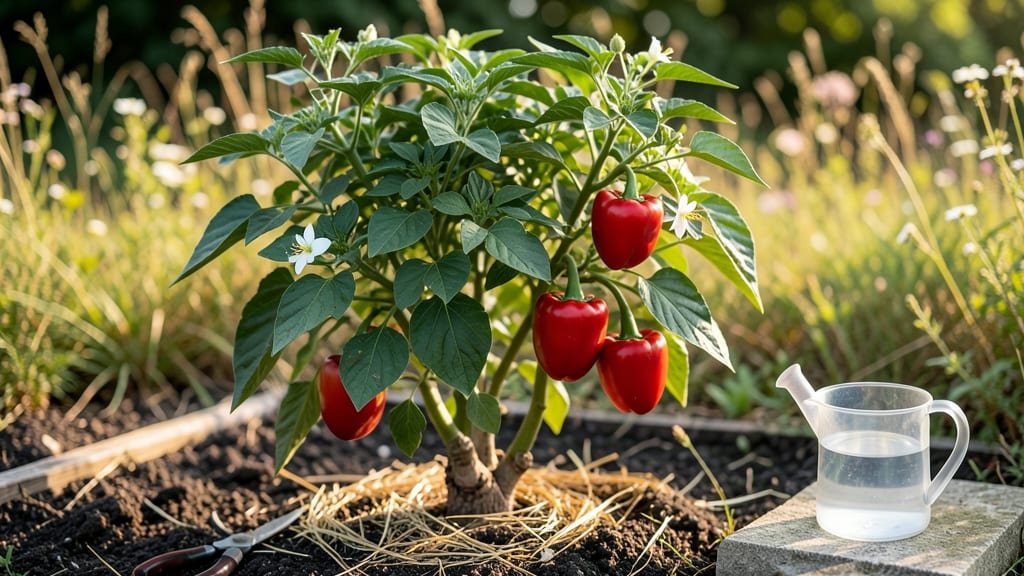
Growing a red bell pepper plant that bursts with color starts with one simple truth: these sun-hungry plants reward patience with sweet, glossy rewards. 🌿 I’ve watched my own plants go from tiny seedlings to heavy-fruited bushes, and the key isn’t some secret fertilizer—it’s matching their needs to what they crave: hot sun, rich soil, and consistent care.
The first harvest is always worth the wait, especially when you’re biting into peppers so vibrant they look too perfect to eat.
You’ll need a spot that gets at least 6-8 hours of direct sunlight daily—no compromise here. The soil should drain well but hold moisture, and a balanced fertilizer at planting time gives them the boost they need.
Most beginners overwater, thinking peppers need constant dampness, but these plants actually prefer to dry out slightly between waterings. Too much moisture leads to blossom-end rot, and nobody wants to toss a pepper because of a white, leathery bottom.
By midsummer, your plant will be a lush, leafy machine producing peppers faster than you can harvest them. The first fruits might be green, but with proper care—regular pruning to improve airflow, consistent watering, and a mid-season nitrogen boost—they’ll ripen to that deep, glossy red we all love.
One plant can yield 10-20 peppers, and if you’ve ever paid $3 for a single store-bought one, you’ll understand why growing your own changes everything.
This method works for garden beds, raised planters, or even large containers—just adjust the space based on your variety. The biggest mistake? Skipping the mulch or ignoring early signs of pests like aphids.
A quick spray of neem oil or introducing ladybugs keeps things under control without harsh chemicals. Once you’ve mastered one plant, you’ll be itching to expand—maybe even trying different colors next season.
📚 In This Guide
- What you need
- Instructions
- Tips and common mistakes
- Wrapping up and next steps
What you need
- ● Red bell pepper seeds: Choose disease-resistant varieties like 'Luna,' 'Carmen,' or 'Red Knight' (10-20 seeds for a small garden).
- ● Seed-starting mix: 3-5 lbs of sterile, well-draining potting soil (avoid garden soil—it’s too dense!).
- ● Containers or seed trays: Biodegradable pots (2-3 inches deep) or cell packs for seedlings.
- ● Grow lights or sunny windowsill: 12-16 hours of light daily (LED grow lights work great if natural light is limited).
- ● Fertilizer: Balanced, water-soluble fertilizer (5-10-5 or 10-10-10 NPK ratio) for seedlings.
- ● Transplant pots or garden space: 12-inch diameter pots or a sunny garden bed (6+ hours of sunlight daily).
- ● Organic mulch: Straw or shredded leaves (2-3 inches) to retain moisture and suppress weeds.
- ● Hand trowel or small shovel: For planting and transplanting.
- ● Watering can or spray bottle: With a gentle nozzle to avoid disturbing seedlings.
- ● Pruning shears: Sharp, clean pair for trimming (sterilize with rubbing alcohol).
- ○ Garden gloves: Protects hands from thorns and soil (optional but handy!).
- ● pH test kit: Ensures soil pH is between 6.0-6.8 (ideal for peppers).
- ● Cage or trellis: For support if plants grow tall (1-2 stakes per plant).
- ● Epsom salt: 1 tbsp per gallon of water for magnesium boost (every 2-3 weeks).
- ● Compost or worm castings: Adds nutrients to soil (1 cup per plant at transplanting).
- ● Row covers: Protects seedlings from pests or late frosts (lightweight fabric).
Step-by-step guide to growing thriving red bell pepper plants
Here’s how I grow bold, productive red bell peppers—no guesswork, just sun, patience, and these key steps.
🌱 Step 1: Start Seeds Indoors at the Right Time
Red bell peppers need a long growing season, so begin seeds indoors 8-10 weeks before your last frost date. I use biodegradable peat pots (the same size as the seeds) filled with sterile seed-starting mix—never garden soil, which can harbor diseases that kill seedlings. Fill each pot to the rim, then press down gently so the surface is firm but not compacted.
Plant 2-3 seeds per pot at a depth of ¼ inch, just below the soil surface. Cover lightly with a sprinkle of mix, then mist gently with water until the soil looks evenly moist. Place the pots in a warm location (around 75-85°F), like on top of a refrigerator or under a heat mat. Germination takes 7-14 days—patience is key here. Once sprouts appear, remove the weakest seedling, leaving the strongest one per pot.
☀️ Step 2: Provide Bright Light and Prevent Leggy Growth
The moment seedlings emerge, move them to a sunny windowsill or under grow lights for 14-16 hours of light daily. Without enough light, seedlings stretch toward the sun (called "leggy"), and those plants rarely recover. You’ll spot leggy growth as thin, pale stems with leaves spaced far apart. If this happens, lower the grow light to 2-3 inches above the plants—closer than you think!
Rotate the pots a quarter turn daily so plants grow straight instead of leaning. After 4-6 weeks, when seedlings have 3-4 true leaves, it’s time to transplant. Harden them off first by placing them outside in partial shade for 1-2 hours the first day, then gradually increasing time over 7-10 days. This toughens them up for the garden.
🪴 Step 3: Plant Outdoors in Warm, Well-Drained Soil
Wait until soil temperatures reach at least 65°F before transplanting—peppers hate cold soil. Choose a sunny spot with 6+ hours of direct sunlight daily (morning sun is ideal). Dig holes slightly larger than the peat pots and space plants 18-24 inches apart—this gives them room to spread and prevents disease. Remove the pot and place the seedling in the hole, then fill with soil, pressing gently around the base.
Water deeply right after planting to settle the soil, but avoid wetting the leaves. Mulch around the base with 2-3 inches of straw or shredded leaves to retain moisture and keep roots cool. Red bell peppers thrive in slightly acidic to neutral soil (pH 6.0-6.8)—test your soil if peppers look stunted or yellow.
💧 Step 4: Water Consistently and Fertilize for Sweet Harvests
Peppers need consistent moisture—about 1 inch of water per week, more during fruit development. Water at the base of the plant in the morning to prevent fungal diseases like blight. You’ll know moisture is right when the top inch of soil feels dry to the touch. Avoid overhead watering, which can splash soil onto leaves and invite pests.
Feed plants every 2-3 weeks with a balanced fertilizer (10-10-10) or a tomato/vegetable blend. I switch to a low-nitrogen, high-phosphorus fertilizer (5-10-10) when flowers appear to encourage fruit set. Prune suckers (the small shoots that form where the stem meets a branch) to direct energy into fruit production. You’ll see the first flowers appear 6-8 weeks after transplanting—this is your cue to step up care.
✂️ Step 5: Harvest at Peak Ripeness for Sweetest Flavor
Red bell peppers take 75-90 days to mature from transplanting, but don’t rush it—wait until they’re fully red and firm for the sweetest flavor. Use pruning shears or clean scissors to cut stems ¼ inch above the fruit. Harvest regularly to encourage more production; I pick every 3-5 days during peak season. Store unripe peppers in the fridge for up to 2 weeks, or let them ripen fully on the plant for deeper flavor.
Here’s the thing—red bell peppers are heavy feeders, so if plants look tired by midseason, give them a boost of compost tea or worm castings. And if you’re in a short-season climate, opt for early-maturing varieties like ‘Carmen’ or ‘Luna’—they’ll still turn red with the right care.
Tips & tricks for growing thriving red bell pepper plants
These practical insights will help you avoid common pitfalls and maximize your harvest—no green thumb required.
Timing is Everything: That 8-10 week indoor starting window is non-negotiable for red bell peppers. I always check my local frost date first, then count backward. If you're in doubt, err on the earlier side—peppers grow faster in warm conditions. For those in Zone 5 or colder, consider using a heat mat to maintain that 75-85°F germination range, especially if your home stays cool.
Lighting Up Your Seedlings: The 14-16 hours of light is crucial, but here's what nobody tells you—seedlings will grow toward the light source. I use a LED grow light on a timer and keep it just 2-3 inches above the plants. If you notice them stretching (leggy growth), lower the light immediately. A simple trick: rotate your pots daily so plants grow straight instead of leaning toward one side.
Soil Temperature Matters: Never transplant when soil temps dip below 65°F—peppers will sulk and refuse to grow. I test soil temperature with a simple thermometer (they're cheap and worth it). If your soil is too cold, wait a few more days or use black plastic mulch to warm it up faster. Also, slightly acidic soil (pH 6.0-6.8) is ideal. If your soil tests too alkaline, mix in some peat moss to adjust the pH before planting.
Harvesting Hack: Those 75-90 days to maturity can feel like forever, but patience pays off. I harvest every 3-5 days during peak season to encourage more production. For storage, leave unripe peppers on the plant if possible—they'll continue ripening. If you must store them, keep them in the fridge for up to 2 weeks, but they won't develop that sweet, rich flavor like vine-ripened ones.
Pro Tips for Red Bell Pepper Plant
- These practical insights will help you avoid common pitfalls and maximize your harvest—no green thumb required.
- Timing is Everything: That 8-10 week indoor starting window is non-negotiable for red bell peppers.
- Lighting Up Your Seedlings: The 14-16 hours of light is crucial, but here's what nobody tells you—seedlings will grow toward the light source.
Frequently asked questions
Got questions about growing your own red bell pepper plant? You’re not alone! Here are answers to the most common queries—from timing to troubleshooting—to help you cultivate a thriving harvest.
How much sunlight does a red bell pepper plant really need?
Aim for 6–8 hours of direct sunlight daily. These sun-lovers thrive in full sun, but partial shade (4+ hours) works in hot climates. Watch for pale leaves or slow growth—signs they’re craving more rays! Learn how to optimize placement.
When is the best time to plant red bell pepper seeds or seedlings?
Start seeds indoors 8–10 weeks before your last frost date (or buy seedlings). Transplant after soil warms to 60°F+—typically late spring or early summer. Cold soil stunts growth, so wait for the heat!
Why are my red bell pepper leaves turning yellow or black?
Yellow leaves often mean overwatering or nutrient deficiency (check roots for rot!). Black spots? Fungal disease (like blight) or sunscald. Improve airflow, avoid wet foliage, and mulch to keep roots stable. Diagnose issues with our plant health guide.
Can I grow red bell peppers in containers, and what size pot do I need?
Use a 5-gallon+ pot with drainage holes. Dwarf varieties (like ‘Apache’) fit in 3-gallon pots. Ensure the container has 12+ inches of depth and place it in full sun. Container plants need frequent watering—they dry out faster!
What can I do if my red bell peppers aren’t turning red?
Peppers need full sun and warm temps (70°F+) to ripen. If they stay green, try:
- Moving plants to sunnier spots.
- Using a plant heat mat for cooler nights.
- Harvesting early (green peppers are still edible!).
Are there low-maintenance alternatives to red bell peppers?
Try these easy picks for beginners:
- Jalapeños: Faster-growing, heat-tolerant, and prolific.
- Shishito peppers: Mild, bushy, and great for containers.
- Cherry tomatoes: Similar care but sweeter rewards!
Wrapping up and next steps
Growing a thriving red bell pepper plant is all about patience, the right conditions, and a little love! 🌱 With the perfect balance of sunlight, well-draining soil, and consistent care, you’ll soon be rewarded with vibrant, flavorful peppers to enjoy fresh or share with friends.
Whether you’re a beginner or a seasoned gardener, every harvest is a small victory worth celebrating.
Ready to take the next step? Start small—plant a seed or two this season! Experiment with varieties, keep an eye on pests, and don’t forget to savor the fruits of your labor. Happy gardening! 🌶️✨