Shrubs
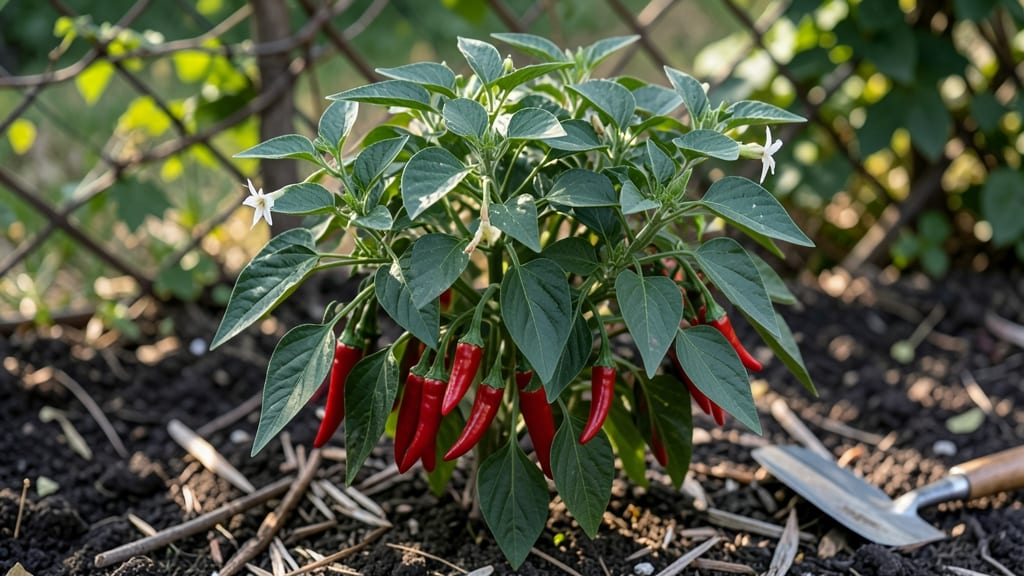
Growing small spicy red peppers from seed delivers unmatched heat—think Thai Bird’s Eye or Cayenne—right from your windowsill or garden. 🌶️ I’ve turned my balcony into a firehouse of flavor by starting seeds indoors in early spring, then transplanting them outside after frost.
The key? Mimicking their tropical roots with warm soil and consistent moisture, even when they’re still tiny. These peppers thrive in full sun (6+ hours daily) and well-draining soil with a dash of compost. Space them 12-18 inches apart to prevent overcrowding, which invites pests and weakens plants.
A balanced fertilizer every 4-6 weeks keeps them producing all season—my Cayennes set fruit within 8 weeks of transplanting, and the heat builds as they ripen from green to fiery red. Blossom end rot? Crunchy leaves? I’ve fixed both with calcium-rich amendments and shade cloth during scorching afternoons.
The payoff? A harvest so spicy it turns your hands red—perfect for sauces, salsas, or just drying for winter. Even my black thumb can’t kill these with the right care.
Start seeds 8-10 weeks before last frost in biodegradable pots to avoid root disturbance. Harden off seedlings for 7-10 days before moving them outside, and mulch heavily to retain moisture.
Prune aggressively after harvest to encourage more fruit—my Thai Bird’s Eyes produced 50+ peppers per plant last year by pinching back leggy growth. For pests, neem oil sprays work wonders on aphids, while companion planting with basil deters whiteflies.
Rotate crops yearly to prevent soil-borne diseases, and save seeds from your best plants for next season’s heat. The first taste of homegrown cayenne? Game-changing.
📚 In This Guide
- What you need
- Instructions
- Tips and common mistakes
- Wrapping up and next steps
What you need
- ● Seeds: 10–20 small spicy red pepper seeds (e.g., Capsicum annuum varieties like ‘Apache,’ ‘Jalapeño,’ or ‘Thai Chili’). Opt for organic or heirloom seeds for best results.
- ● Seed-starting mix: 2–3 gallons of sterile, well-draining potting soil (avoid garden soil—it can harbor diseases).
- ● Containers: 4–6 small pots (4–6 inches deep) for seedlings, or
- ● 1–2 seed trays with individual cells (if starting indoors).
- ● Grow lights or sunny windowsill: A full-spectrum LED grow light (12–16 hours/day) or a south-facing window with 6+ hours of sunlight.
- ● Watering can or spray bottle: With a fine rose attachment to avoid disturbing seeds.
- ● Fertilizer: Balanced liquid fertilizer (e.g., 10-10-10 or fish emulsion) for seedlings, and a low-nitrogen option (e.g., 5-10-10) once transplanted.
- ● Trowel or small shovel: For transplanting seedlings.
- ○ Gloves: Optional but recommended—some peppers (like Thai chilies) can irritate skin! 🧤
- ● Pruning shears: For trimming leggy seedlings or shaping plants later.
- ● Mulch: Straw or shredded leaves to retain moisture and suppress weeds.
- ○ Support (optional): Stakes or cages (3–4 feet tall) if your pepper variety grows tall.
- ● Climate: Peppers thrive in warm weather (70–90°F). Start seeds indoors 8–10 weeks before the last frost or wait until soil is 60°F+ to plant outdoors.
- ● Sunlight: At least 6–8 hours of direct sunlight daily (more = happier peppers!).
- ● Space: 12–18 inches between plants (or 18–24 inches for bushier varieties).
- ● Patience: Small spicy peppers take 60–90 days to mature—plan ahead for the heat! 🌶️
- ● pH test kit: Aim for soil pH 6.0–6.8 (peppers are slightly acidic-loving).
- ● Row covers: Protect young plants from pests or late frosts.
- ● Compost or worm castings: Boost soil fertility for extra-spicy yields.
- ● Harvest basket: A small mesh bag to carry peppers without bruising them.
Step-by-step instructions for cultivating small spicy red peppers
Here's how I grow fiery little red peppers that pack serious heat—no greenhouses or fancy equipment needed.
🌱 Step 1: Start Seeds Indoors for Early Heat
Small spicy red peppers like 'Apache' or 'Carolina Reaper' need a long growing season, so I begin seeds indoors 8-10 weeks before the last frost. Use biodegradable seedling pots (2-3 inches deep) filled with sterile seed-starting mix—never garden soil, which can harbor diseases that kill seedlings.
Plant 2-3 seeds per pot at a depth of ¼ inch, then cover lightly with mix. Mist gently with water until the surface looks uniformly damp. Place pots in a seedling heat mat (70-80°F) to speed germination, which typically takes 7-14 days. Keep the soil consistently moist but never soggy—overwatering causes damping-off, a fungal disease that collapses stems overnight.
☀️ Step 2: Provide Bright Light and Prevent Legginess
The moment seedlings emerge, move them under grow lights (14-16 hours daily) or to a south-facing window. Without enough light, seedlings stretch toward the sun with weak, pale stems—a condition called "leggy" growth. You’ll spot this when stems grow thin and elongated with leaves spaced far apart.
Keep lights 2-4 inches above seedlings and raise them gradually as plants grow. Strong seedlings have thick stems and dark green leaves. Once they develop 2-3 true leaves (not the first seed leaves), fertilize lightly with a balanced liquid fertilizer (5-5-5) diluted to half strength. This jumpstarts root and foliage growth without burning tender plants.
🪴 Step 3: Transplant Outdoors After Hardening Off
Two weeks before the last frost, begin hardening off seedlings by placing them outside in a sheltered spot for 1-2 hours the first day. Gradually increase time over 10-14 days, ending with full sun exposure. This toughens seedlings so they withstand outdoor conditions without shock.
Transplant after all danger of frost has passed and soil warms to at least 60°F. Space plants 18-24 inches apart in full sun (6+ hours daily) with well-draining soil. Bury seedlings slightly deeper than their original pots—this encourages stronger root systems. Water deeply at the base to settle soil and reduce transplant stress.
💧 Step 4: Maintain Consistent Moisture and Fertility
Peppers thrive with 1-1.5 inches of water weekly, delivered at the soil line—not overhead. Overhead watering spreads fungal diseases like powdery mildew, which turns leaves white and crispy. You’ll know moisture is right when the top inch of soil feels dry to the touch.
Feed plants every 2-3 weeks with a balanced fertilizer (10-10-10) until flowers appear, then switch to a low-nitrogen, high-phosphorus formula (5-10-10) to boost fruiting. Prune suckers (the small shoots growing between the main stem and branches) to direct energy into peppers. Watch for reddish-brown spots on leaves—this signals early blight, which thrives in wet foliage.
⏰ Step 5: Harvest at Peak Heat and Encourage Continuous Production
Small red peppers reach maturity 60-90 days after transplanting, depending on the variety. Harvest when they turn deep red and feel firm to the touch. Use clean pruners to snip stems, leaving a small portion attached to the plant. This prevents disease entry and encourages more peppers to form.
To extend the harvest, remove spent flowers and peppers as they ripen. This redirects the plant’s energy into new growth. Store fresh peppers in the fridge for 1-2 weeks or dry them for long-term use. The longer they stay on the plant, the hotter they get—so if you’re growing for heat, leave them until fully red and slightly wrinkled.
Tips & tricks for cultivating fiery small red peppers
A few game-changing tricks that'll transform your pepper-growing game from good to downright explosive with heat.
Germination Success: The 7-14 day germination window is your first critical test. I've learned the hard way that consistency is key—maintain that 70-80°F heat mat temperature and keep the soil moist but never soggy. If you notice condensation forming on the plastic dome (if using one), lift it for 10 minutes to prevent fungal growth that can kill seedlings before they even sprout.
The Light Factor: Those 14-16 hours of daily light aren't just about growth—they're about preventing leggy seedlings. I use a simple trick: place a ruler next to the seedlings and adjust the light height so it's always 2-4 inches away. Watch for that classic "reaching" posture where stems elongate and leaves space out—this means your seedlings are starving for light.
Hardening Off Strategy: The gradual 10-14 day hardening process is where most beginners rush and get burned (literally). Start with just 1-2 hours on day one in a sheltered spot, then increase by 30 minutes each day. I like to place seedlings in a spot that gets morning sun but afternoon shade—this mimics natural conditions and prevents shock when you finally transplant them outdoors.
Peak Heat Preservation: For maximum spiciness, leave those red peppers on the vine until they're fully mature and slightly wrinkled. The longer they stay, the more capsaicin develops. But here's the secret: when harvesting, wear gloves! The oils from your skin can transfer to the peppers and make them even hotter when you handle them later—something I discovered after eating a batch that made my mouth feel like it was on fire for hours.
Pro Tips for Small Spicy Red Peppers
- A few game-changing tricks that'll transform your pepper-growing game from good to downright explosive with heat.
- Germination Success: The 7-14 day germination window is your first critical test.
- The Light Factor: Those 14-16 hours of daily light aren't just about growth—they're about preventing leggy seedlings.
Frequently asked questions
Got questions about growing and using small spicy red peppers?
Here are some of the most common ones—plus quick, practical answers to help you spice up your garden (and your meals!) with confidence.
How long does it take for small spicy red peppers to mature?
Most small spicy red peppers, like Thai chilies or Bird’s Eye chilies, take 60–90 days from transplant to harvest after the last frost. Start seeds indoors 8–10 weeks before your last frost date for a summer-long supply of heat! Pro tip: Check the seed packet for exact days—some varieties are faster than others.
Why are my small red peppers not spicy?
Spice levels depend on variety, ripeness, and sunlight. Green peppers are milder—let them turn bright red for maximum heat! If they’re still bland, check your growing conditions: full sun (6+ hours/day) and consistent watering boost flavor and capsaicin (the compound that makes them spicy).
Can I substitute small red peppers for other hot peppers?
Use them 1:1 in recipes where you’d normally add jalapeños, Thai chilies, or serranos. For extra heat, remove seeds/membranes—they contain most of the capsaicin. Need milder heat? Swap in bell peppers or banana peppers instead. Fun fact: Their intense flavor works great in salsas, stir-fries, and even homemade hot sauces!
What should I do if my pepper plants get pests or diseases?
Common issues include aphids, spider mites, or powdery mildew. For pests, spray with neem oil or introduce ladybugs. For mildew, improve airflow and avoid overhead watering. Preventative tip: Rotate crops yearly and use compost-rich soil to keep plants strong. If leaves yellow, check for overwatering—peppers hate soggy roots!
How do I store or preserve small red peppers for later?
Fresh peppers last 1–2 weeks in the fridge. For long-term storage, try these methods:
- Freezing: Wash, dry, and chop peppers, then freeze in airtight bags (up to 6 months).
- Drying: Tie stems into bundles and hang in a dark, dry place for 2–4 weeks.
- Pickling: Use vinegar, salt, and spices for jars that last 1 year.
- Fermenting: Make hot sauce or kimchi with peppers for probiotic-rich flavor.
Wrapping up and next steps
From seed to harvest, growing your own small spicy red peppers is a rewarding journey that brings bold flavors and fiery excitement to your kitchen! 🌶️ With the right soil, sunlight, and care, you’ll enjoy homegrown heat that’s fresher—and more satisfying—than anything store-bought.
Whether you’re a seasoned gardener or a curious beginner, your green thumb (or even just a little patience) will soon turn into a harvest of vibrant, spicy treasures.
Ready to take the next step? Start with a single seed or plant and watch your passion for gardening—and your love for heat—grow! 🌱🔥