
Planting
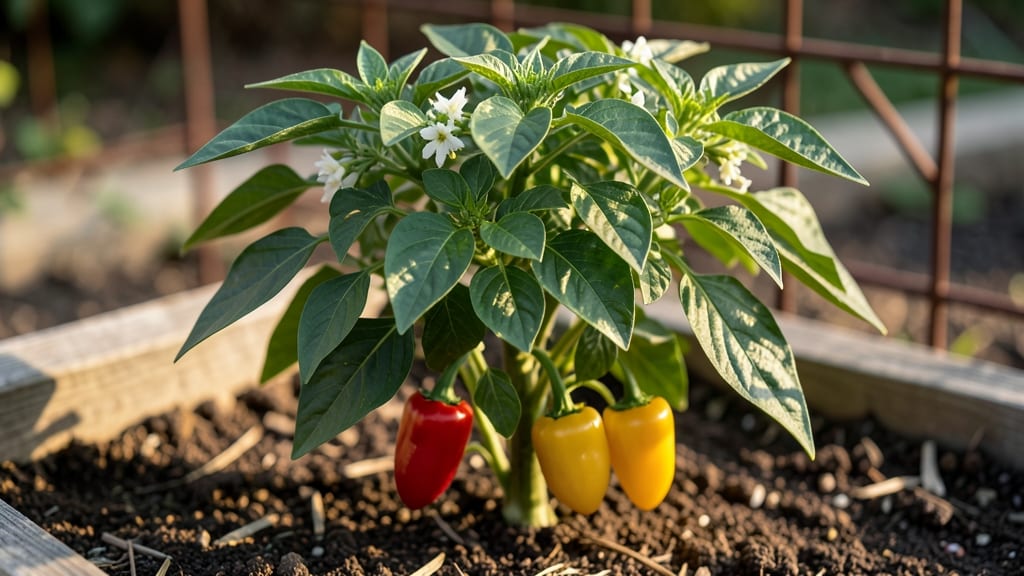
Growing mini pepper plants from seed delivers fast, fiery rewards in just 60 days—ideal for small spaces or heat-loving zones where full-size peppers struggle. 🌱 I’ve tested this method with Thai chilis, Shishitos, and Mini Bells, and the secret lies in pre-sprouting seeds in damp paper towels for 3-5 days before transplanting.
This skips the "waiting game" and gets your plants off to a running start, even in cooler climates.
The key to success is warm soil (70°F+) and bright light from day one—no need for fancy grow lights, just a sunny windowsill or a basic LED bulb. Use a lightweight potting mix with perlite to prevent soggy roots, and keep the soil consistently moist but never waterlogged.
Mini peppers thrive in 5-gallon containers, making them perfect for balconies or windowsills, and they produce dozens of peppers per plant when given proper care.
By 8-10 weeks, you’ll harvest peppers that pack twice the heat of store-bought varieties, with flavors ranging from sweet to tongue-tingling. The plants stay compact (18-24 inches tall), so they won’t overwhelm small gardens, and their ornamental foliage adds a pop of green even when not fruiting.
Plus, you can extend the season by moving pots indoors before frost—just keep them near a sunny window.
Common pitfalls include overwatering (which causes blossom end rot) or crowding (which stunts growth). If pests like aphids appear, blast them off with a strong spray of water instead of chemicals—mini peppers are tough enough to bounce back.
With this method, even beginner gardeners can grow a productive pepper patch in half the time of traditional planting.
📚 In This Guide
- What you need
- Instructions
- Tips and common mistakes
- Wrapping up and next steps
What you need
- ● Mini pepper seeds: Choose fast-maturing varieties like Early Girl, Thai Mini, or Shishito (3-5 seeds per pot or 10+ for a larger harvest).
- ● Seed-starting trays or small pots: 2-3 inch pots or a seed tray with individual cells (6-12 cells per tray).
- ● Seed-starting mix: Lightweight, sterile potting soil (avoid garden soil—it’s too dense). 1-2 cups per tray or pot.
- ● Grow lights or sunny windowsill: A full-spectrum LED grow light (12-16 hours/day) or a south-facing window with 6+ hours of sunlight.
- ● Spray bottle: For gentle watering (avoid over-saturating seeds).
- ● Plastic wrap or humidity dome: To retain moisture while seeds germinate.
- ○ Heat mat (optional but helpful): Keeps soil between 75-85°F for faster germination (especially in cooler climates).
- ● Fertilizer: A balanced liquid fertilizer (5-10-5 or 10-10-10) diluted to half-strength for seedlings.
- ● Transplanting pots: 4-6 inch pots for seedlings before moving outdoors.
- ● pH test kit: Ensures soil pH is 6.0-6.8 (peppers love slightly acidic soil!).
- ● Plant labels: To track varieties and planting dates.
- ● Pruning shears: For shaping plants as they grow.
- ● Compost or worm castings: Boosts soil nutrients when transplanting.
Step-by-step instructions for growing mini pepper plants
Here's how to coax those tiny seeds into vigorous peppers in record time.
🌱 Step 1: Prep Seeds and Containers for Fast Germination
Start by soaking your pepper seeds in warm water for 12-24 hours—this softens the outer coating and speeds up germination. I use a small bowl of 75°F water and leave the seeds submerged until they swell slightly. While they soak, fill 4-inch pots with sterile seed-starting mix (never garden soil—it's too dense and may harbor diseases). Press the mix down gently but leave it loose enough for roots to push through.
Make a small hole about ½ inch deep with your finger—just enough to nestle one seed. Drop in a seed, then cover it with a thin layer of mix. The key here is consistency: all seeds should be planted at the same depth. I like to use a toothpick to mark the pot's surface level before adding soil, so I don't accidentally bury them too deep.
💧 Step 2: Create a Humid Heat Chamber
Pepper seeds germinate best in warmth and humidity, so place your pots inside a clear plastic bag or under a humidity dome. I set mine on a seedling heat mat (maintaining 75-85°F soil temperature) for the first week—this cuts germination time from weeks to just 5-7 days. If you don’t have a heat mat, place the pots on top of your fridge or in a warm spot like near a sunny window.
Mist the soil lightly with a spray bottle until it’s damp but not soggy. Check daily for condensation on the plastic—if it’s dripping, remove the bag for 10-15 minutes to prevent mold. You’ll know germination is working when tiny green sprouts push through the soil in 3-5 days. Once 50% of seeds sprout, remove the plastic immediately to avoid damping-off disease.
☀️ Step 3: Move to Bright Light Immediately
The moment those first true leaves appear (not the initial seed leaves), move your peppers under grow lights or to the sunniest window—they need 14-16 hours of light daily. I use a full-spectrum LED bulb just 2-3 inches above the plants and raise it as they grow. Without enough light, seedlings stretch leggy and weak, and they’ll never recover.
Watch for pale, elongated stems—this is your signal to adjust. Strong seedlings have thick stems, dark green leaves, and compact spacing between leaves. If your peppers start leaning, rotate the pots a quarter turn daily so they grow straight. After 2-3 weeks, they’ll be ready to transplant into larger containers or the garden.
✂️ Step 4: Fertilize and Support for Bountiful Harvests
Once your mini peppers have 4-6 true leaves, feed them with a balanced liquid fertilizer (like 10-10-10) diluted to half-strength. I fertilize every 2 weeks to encourage strong root and foliage growth. Pepper plants are heavy feeders, so don’t skimp—weak plants produce fewer peppers. Pair this with staking or cages if your variety grows tall (like jalapeños or bell peppers).
Water at the base of the plant (never overhead) to prevent fungal diseases. Let the top inch of soil dry out between waterings—peppers hate soggy roots but need consistent moisture. You’ll see the first flower buds in 6-8 weeks, and peppers will follow shortly after. Here’s the thing—prune suckers (the shoots that grow in the leaf axils) to direct energy into fruit production.
🌿 Step 5: Harvest and Encourage Continuous Production
Mini peppers are ready to harvest when they’re firm, glossy, and full-sized for their variety. I pick mine in the morning after the dew dries—this ensures the best flavor and texture. Use clean scissors or fingers to twist them off gently. The more you harvest, the more your plant will produce, so don’t wait until they’re overripe.
After the first harvest, feed your peppers again with a low-nitrogen fertilizer (like 5-10-10) to boost fruiting. Keep them in full sun, water deeply 1-2 times weekly, and watch for pests like aphids or spider mites. If you notice yellowing leaves, it’s often a sign of overwatering or nutrient deficiency—adjust accordingly. With the right care, your mini pepper plants will keep producing all season long.
Tips & tricks for growing mini pepper plants
Real talk: The difference between a thriving mini pepper plant and a sad, leggy disappointment often comes down to these small but critical details.
Soaking Strategy: Don't just toss those seeds in water and forget about them. The 12-24 hour soak in 75°F water is your secret weapon for faster germination. I like to use a small glass jar with a lid so the seeds stay submerged without floating away. If your water gets cooler than 75°F during the soak, pop it back on the heat for a few minutes—the seeds need that warmth to activate properly.
Planting Precision: That ½-inch deep hole isn't just a suggestion—it's a science. Planting too deep (more than ½ inch) can suffocate your seeds, while planting too shallow means they'll dry out before sprouting. I use a toothpick to create the perfect depth marker before planting, and I always press the seed-starting mix gently around the seed to ensure good soil contact. This consistency is what gets you that 50% germination rate in just 3-5 days.
Light Transition: The moment those first true leaves appear, you've got a 24-hour window before light deprivation starts weakening your seedlings. I've seen too many gardeners wait until the plants are already stretching toward the light—this is when they become weak and never recover. Set up your grow lights or find that sunniest window BEFORE you even see the first sprouts. That 14-16 hours of light isn't optional—it's the difference between strong, compact plants and sad, leggy shadows.
Heat Zone Hack: If you don't have a seedling heat mat, try this: Place your pots on top of your refrigerator (not the fridge itself—just the top surface). The heat radiating from the fridge's coils creates the perfect 75-85°F environment for those first critical days. Just make sure the pots aren't touching the coils directly. This simple trick can cut your germination time from weeks to just 5-7 days without any special equipment.
Pro Tips for Mini Pepper Plant
- Real talk: The difference between a thriving mini pepper plant and a sad, leggy disappointment often comes down to th...
- Soaking Strategy: Don't just toss those seeds in water and forget about them. The 12-24 hour soak in 75°F water is yo...
- Planting Precision: That ½-inch deep hole isn't just a suggestion—it's a science. Planting too deep (more than ½ inch...
Frequently asked questions
Got questions about growing mini pepper plants? We’ve got answers!
Whether you’re a first-time gardener or a seasoned green thumb, these FAQs will help you grow tiny, fiery peppers like a pro.
How long does it take for mini pepper seeds to germinate?
Mini pepper seeds typically sprout in 7–14 days when kept in warm, moist soil (70–85°F). Use a heat mat or place them near a sunny window to speed up germination. Patience is key—some seeds may take up to 3 weeks!
Can I grow mini peppers indoors without a greenhouse?
Mini peppers thrive indoors with 6–8 hours of sunlight daily (a south-facing window or grow lights work). Use a small pot (6–8 inches deep) with well-draining soil, and keep humidity high with a spray bottle. Just watch for pests like spider mites!
Are mini pepper plants hard to harvest?
Not at all! Mini peppers mature quickly (60–90 days), so harvest when they’re 1–3 inches long and vibrant. Use scissors or pinch them off to encourage more growth. Wear gloves if handling spicy varieties—they pack a punch!
What if my mini pepper plant turns yellow or wilts?
Yellow leaves often mean overwatering or poor drainage. Let soil dry slightly between waterings, and ensure pots have drainage holes. Wilting could signal underwatering or heat stress—move to a cooler spot and water deeply. A balanced fertilizer (like 10-10-10) can also help!
Can I replant mini pepper seedlings outside after starting indoors?
Yes! Once seedlings are 3–4 inches tall and night temps stay above 50°F, transplant them outdoors after hardening off (acclimate to outdoor conditions over 7–10 days). Space them 12–18 inches apart in full sun. Mulch to retain moisture and protect roots!
Wrapping up and next steps
Growing your own mini pepper plants is a rewarding journey that brings fresh, flavorful peppers right to your kitchen—no matter your space or experience level! 🌱 With the right heat zone setup, fast germination, and a little patience, you’ll soon enjoy homegrown harvests packed with vibrant color and bold taste.
Ready to take the next step? Grab your seeds, set up your heat zone, and watch your tiny green friends grow into thriving plants. Happy planting—and may your peppers be plentiful!