
Container Gardens
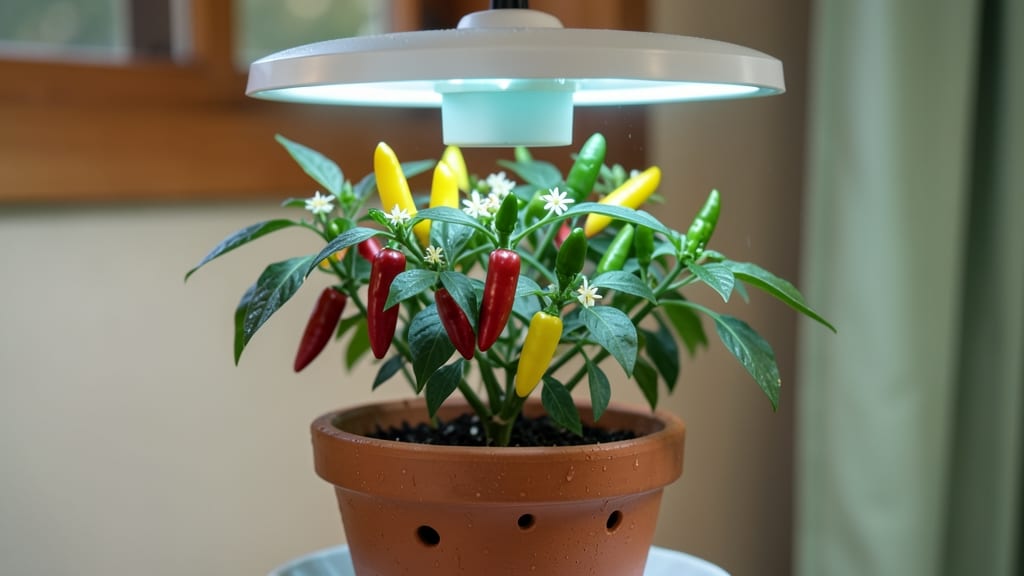
Growing chili peppers indoors delivers fresh heat straight from your windowsill—no greenhouse needed. 🌱 I’ve turned my kitchen into a mini pepper farm, and the key is replicating their tropical home with just a few smart adjustments.
The right container, bright light, and consistent warmth will have you harvesting peppers in 8-12 weeks, even if you’re stuck in a shady apartment. Start with a 5-gallon pot and well-draining soil mix (think cactus blend with compost).
Place your peppers near the sunniest window—south-facing is ideal—or supplement with a LED grow light for 12-16 hours daily. Overwatering is the silent killer, so let the top inch of soil dry between waterings. A small fan nearby mimics outdoor breezes, which strengthens stems and prevents disease.
By mid-summer, you’ll be snipping ripe peppers straight into salsas or drying them for winter. The first harvest is the sweetest reward—imagine plucking a jalapeño or habanero that’s never left your home.
Just watch for pests like spider mites (spray with neem oil if they appear) and keep temps above 65°F for happy plants. This method works for any variety, from mild bell peppers to ghost peppers.
Start small, scale up, and soon your kitchen will smell like a spice market—and your friends will beg for your homegrown heat.
📚 In This Guide
- What you need
- Instructions
- Tips and common mistakes
- Wrapping up and next steps
What you need
- ● Containers: 5–10-inch pots (1–2 per plant) with drainage holes. Pro tip: Use fabric grow bags for better aeration!
- ● Potting Mix: 1–2 bags of high-quality, well-draining blank">seed-starting mix or a blend of 60% peat moss, 30% perlite, and 10% compost.
- ● Chili Seeds or Seedlings: 2–5 seeds or young plants (varieties like Jalapeño, Habanero, or Thai Chili work great indoors!).
- ○ Grow Lights (Optional but Recommended): LED blank">full-spectrum grow lights (12–16 watts per square foot).
- ● Timer (14–16 hours of light/day).
- ● Fertilizer: Balanced liquid fertilizer (e.g., 10-10-10) or organic options like fish emulsion or worm castings.
- ● Spray Bottle: For gentle watering and humidity control.
- ● Trowel or Small Shovel: For transplanting seedlings.
- ● Pruning Shears: To trim dead leaves or encourage bushier growth.
- ● Humidity Dome or Plastic Wrap: Keeps seedlings cozy while germinating.
- ○ Thermometer (Optional): Monitors ideal temps (70–85°F during the day).
- ● Support Stakes or Cages: For taller varieties like Cayenne or Serrano.
Step-by-Step instructions for growing chili peppers indoors
Here's how to coax fiery, flavorful peppers from seeds to harvest on your windowsill.
🌱 Step 1: Start Seeds in Warm, Moist Soil
Fill small pots with sterile seed-starting mix—never garden soil, which can harbor pathogens. Chili seeds need warmth to germinate, so place pots on a seedling heat mat set to 75-85°F. Moisten the soil until it feels like a wrung-out sponge, then press seeds ¼ inch deep into the surface.
Cover the pots with clear plastic wrap to trap humidity and place them in bright, indirect light. Germination takes 7-14 days, but don’t water again until the soil surface feels dry to the touch. Real talk: If you overwater now, you’ll smother those tiny seeds before they even sprout.
☀️ Step 2: Provide Full Sun and Consistent Heat
Once seedlings emerge, remove the plastic wrap and move them to a south-facing window where they’ll get 6-8 hours of direct sunlight daily. If your window isn’t sunny enough, supplement with a grow light kept 2-3 inches above the plants for 14-16 hours per day. Leggy seedlings mean your light is too far away—adjust it immediately.
Keep the soil warm (70-80°F) and water only when the top inch feels dry. Chili peppers hate soggy roots, so let excess water drain completely. You’ll see the first true leaves (not the initial seed leaves) appear in 2-3 weeks—that’s your cue to start fertilizing lightly with a balanced liquid fertilizer diluted to half strength.
🪴 Step 3: Transplant and Support Growth
When seedlings have 4-6 true leaves (about 6-8 weeks after sowing), transplant them into 5-7 inch pots filled with well-draining potting mix. Handle the roots gently—chilis resent disturbance. Bury the stems slightly deeper than they were in the seedling pot to encourage stronger root growth.
After transplanting, water deeply and place the pots in a sunny spot where temperatures stay above 65°F. If your home runs cooler, group pots together to create a microclimate that retains warmth. Prune any yellowing leaves immediately—they sap energy from your pepper’s fruit production.
✂️ Step 4: Prune and Harvest for Maximum Yield
When plants reach 12-18 inches tall, pinch off the first flower cluster to encourage bushier growth. This isn’t optional—skipping it leads to long, leggy stems with fewer peppers. After the main stem develops 4-5 leaves, let it flower naturally. You’ll see tiny buds form in the leaf axils—these will turn into your harvest.
Harvest peppers when they reach ¾ of their mature size for the best flavor. Use clean scissors to snip stems, leaving a small portion attached to the plant. Store ripe peppers in a cool, dark place for up to 2 weeks, or dry them in a well-ventilated area for long-term storage. The heat in your kitchen will work just fine—just keep them out of direct sunlight.
Tips & tricks for perfect indoor chili pepper growth
A few simple tricks will help you avoid common pitfalls and maximize your windowsill harvest.
Heat Mat Precision: For Step 1, don't just set your heat mat to the 75-85°F range—check the actual temperature with an infrared thermometer. Chili seeds need consistent warmth, and even small fluctuations below 75°F can delay germination by days. I've seen seeds take 21 days to sprout when kept at 72°F, versus just 7 days at a steady 80°F. Place your thermometer near the soil surface where the seeds are nestled.
Light Quality Matters: In Step 2, when supplementing with grow lights, choose full-spectrum LEDs rather than standard white bulbs. The blue spectrum (around 450nm) is particularly important for plant growth, and white bulbs often lack sufficient blue light. Position your light just 2-3 inches above the plants—closer than this can scorch tender seedlings, while farther away leads to leggy, weak growth. I've had to replace entire batches of seedlings because I didn't adjust the light height after they grew taller.
Transplanting Technique: When handling those delicate roots in Step 3, use the "root dip" method: After carefully removing the seedling from its pot, dip the entire root ball in a mixture of water and liquid fertilizer (half-strength). This helps reduce transplant shock by giving the roots a quick nutrient boost. Work quickly—chili roots dry out fast when exposed to air. I've found that seedlings treated this way recover better and start growing new roots within 3-4 days after transplanting.
Pruning Strategy: For Step 4, when pinching off that first flower cluster, look for the spot just above a set of leaves where two leaves meet (the leaf axil). This is where new branches will form. Don't pinch too high—leave at least 4-5 leaves below your cut to maintain photosynthesis capacity. I've seen plants with only 2 leaves below the pinch struggle to support new growth, while properly pinched plants develop bushier structures that produce 30-50% more peppers.
Pro Tips for Growing Chili Peppers Indoors
- A few simple tricks will help you avoid common pitfalls and maximize your windowsill harvest.
- Heat Mat Precision: For Step 1, don't just set your heat mat to the 75-85°F range—check the actual temperature with an infrared thermometer.
- Light Quality Matters: In Step 2, when supplementing with grow lights, choose full-spectrum LEDs rather than standard white bulbs.
Frequently asked questions
Got questions about growing chili peppers indoors? You’re not alone! Here are some of the most common concerns—and their solutions—to help you cultivate a thriving indoor garden.
How much sunlight do chili peppers really need indoors?
Chilis thrive on 6–8 hours of direct sunlight daily. A south-facing window is ideal, but if yours isn’t sunny enough, supplement with a grow light (LED or fluorescent) 12–16 inches above the plants. Rotate pots weekly for even growth!
When will my indoor chili peppers produce fruit?
With proper care, expect first peppers in 60–90 days from transplanting. Smaller varieties (like ‘Thai Hot’) may fruit faster, while larger types (like ‘Jalapeño’) take longer. Patience is key—consistent light and warmth speed up the process!
Why are my chili pepper leaves turning yellow?
Yellow leaves usually signal overwatering or nutrient deficiency. Let the top inch of soil dry out between waterings, and fertilize every 2–4 weeks with a balanced, phosphorus-rich formula. Check for pests too—aphids or spider mites love chilis!
Can I grow chili peppers in small spaces like apartments?
Use 5–10 gallon pots with drainage, and opt for compact varieties like ‘Shishito’ or ‘Poblano.’ Hang lights, use vertical planters, or try a self-watering system to save space. Even a sunny kitchen windowsill works!
What’s the best temperature for indoor chili peppers?
Chilis love warmth—keep temps between 70–85°F (21–29°C) during the day and 60–70°F (15–21°C) at night. Avoid drafts (like AC vents) or sudden temperature swings. A heat mat can help if your home runs cool.
Wrapping up and next steps
Growing chili peppers indoors is a rewarding journey that brings bold flavors and vibrant greenery right to your kitchen! With the right setup—sunlight, warmth, and a little patience—you’ll soon be harvesting peppers that add serious heat to your dishes.
Whether you’re a first-time gardener or a seasoned plant parent, this adventure is packed with satisfaction and delicious payoffs.
Ready to take the next step? Start with a single plant, experiment with varieties, and let your indoor garden grow! 🌱🔥 Share your progress with fellow chili enthusiasts or treat yourself to a homegrown salsa—your future self (and taste buds) will thank you!