
Container Gardens
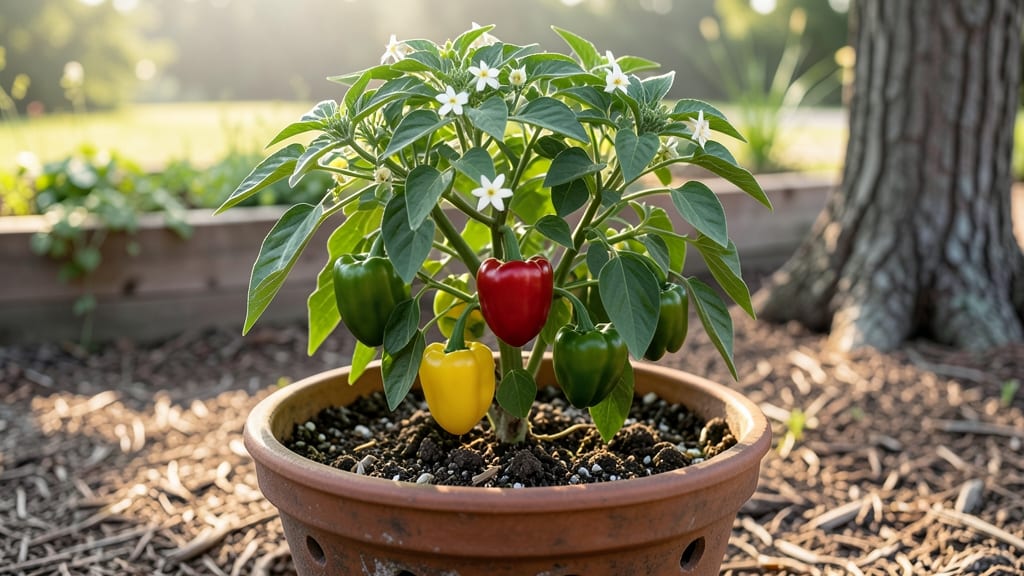
Growing bell pepper plants in containers lets you enjoy fresh harvests even on balconies or patios. 🌱 I’ve grown peppers in pots for years, and the right compact varieties—like ‘Patio Princess’ or ‘Jupiter’—produce just as well as their in-ground cousins, if not better.
The key is matching container size to plant needs and keeping conditions consistent, which is easier in containers than you’d think.
You’ll need containers at least 5 gallons per plant (bigger is better for larger varieties), well-draining potting mix, and a spot with 6-8 hours of sunlight daily. Bell peppers are heavy feeders, so I add a slow-release fertilizer at planting and top-dress with compost every 4-6 weeks.
Overwatering is the biggest mistake—let the top inch of soil dry out between waterings to prevent blossom-end rot.
By midsummer, you’ll be picking glossy, firm peppers straight from your balcony. The flavor? Just as sweet and vibrant as store-bought, but with the satisfaction of growing them yourself. Plus, container peppers stay cleaner and are easier to protect from pests like aphids or hornworms.
This method works for any space—even apartments—and lets you grow peppers year after year. Whether you’re a first-timer or a seasoned container gardener, the payoff is worth the effort. Ready to get started?
📚 In This Guide
- What you need
- Instructions
- Tips and common mistakes
- Wrapping up and next steps
What you need
- ● Containers: 5-gallon pots or larger (at least 18–24 inches deep) with drainage holes. Quantity: 1 per plant (or 1 large container for multiple plants, spaced 12–18" apart).
- ● Potting Mix: High-quality, well-draining container mix (avoid garden soil—it compacts!). Quantity: 1–2 bags (5–7 cubic feet) per plant.
- ● Bell Pepper Seeds or Seedlings: Seeds: Compact varieties like ‘Jupiter’ or ‘Aristotle’ (slow-growing, bushy). Quantity: 2–3 seeds per container.
- ● Seedlings: Transplant-ready, 4–6 weeks old. Quantity: 1 per container.
- ● Fertilizer: Balanced, slow-release fertilizer (10-10-10 or 5-5-5) or organic options like composted manure. Quantity: 1–2 tbsp per plant at planting + monthly feeding.
- ● Drainage Material: Small rocks, pebbles, or broken pottery (¼-inch layer) for pots without built-in drainage.
- ● Watering Can or Hose: With a gentle spray nozzle for even moisture.
- ○ Stakes or Cages (Optional but Helpful): 4–6 ft tall for support (especially for heavier varieties).
- ● Mulch: Straw or shredded leaves to retain moisture and suppress weeds.
- ● pH Test Kit: To ensure soil pH is 6.0–6.8 (bell peppers love slightly acidic soil!).
- ● Grow Lights: LED or fluorescent lights (12–16 hrs/day) if growing indoors or in low-light spots.
- ● Epsom Salt: For magnesium boost (1 tbsp per gallon of water, monthly).
- ● Insect Netting: To protect from pests like aphids or hornworms.
Step-by-Step guide to growing bell peppers in containers
Here's how to grow thriving bell peppers in limited space using proven container techniques.
🌱 Step 1: Select the Right Containers and Compact Varieties
Choose 5-gallon containers or larger—bell peppers need deep roots and strong support. I recommend compact varieties like 'Sweet Banana' or 'Jupiter' that thrive in containers while producing plenty of fruit. Ensure each pot has multiple drainage holes to prevent root rot, which is the #1 killer of container-grown peppers.
Fill the bottom 2 inches with gravel or perlite for extra drainage. This layer prevents waterlogging while allowing roots to spread freely. If using terra cotta pots, soak them in water for 24 hours before planting—this prevents them from wicking moisture away too quickly during hot days.
🌿 Step 2: Prepare Soil and Plant Seedlings
Use a lightweight potting mix blended with compost for nutrients. I mix 1 part compost into 3 parts potting soil to ensure fertility without compaction. Fill the container to 1 inch below the rim, leaving space for watering. Press the mix down gently—firm but not packed—so roots can establish without struggling.
Plant one seedling per container, placing it at the same depth it grew in its nursery pot. This prevents stem rot from buried stems. Water deeply right after planting to settle the soil around roots. Avoid wetting the leaves—damp foliage invites fungal diseases like early blight, which can devastate container-grown peppers.
☀️ Step 3: Provide Full Sun and Consistent Heat
Bell peppers demand 6-8 hours of direct sun daily. Place containers on a south-facing patio, balcony, or deck where they won’t be shaded by buildings or trees. If you’re growing indoors near a window, supplement with a grow light kept 6-12 inches above the plants for 14-16 hours/day. You’ll see leggy, weak growth if light is insufficient—this is your cue to adjust.
Keep soil temperatures at 70-85°F for optimal growth. Use a heat mat under containers if nights dip below 55°F, or move pots to a warmer location during cool spells. Peppers stop flowering and fruiting when temps drop below 60°F, so protect them from late-season chills with row covers if needed.
💧 Step 4: Water Deeply and Fertilize Regularly
Water when the top 1-2 inches of soil feel dry—this prevents blossom-end rot (a calcium deficiency caused by uneven moisture). I use a drip irrigation system or water at the base of the plant in the morning to avoid fungal issues. Overhead watering can spread disease and dilute soil nutrients, so I avoid it unless rinsing pests.
Feed every 2-3 weeks with a balanced liquid fertilizer (10-10-10 or 20-20-20) diluted to half-strength. When flowers appear, switch to a low-nitrogen, high-phosphorus fertilizer (like 5-10-10) to boost fruiting. You’ll notice larger, healthier peppers within weeks—this is your reward for consistent care.
✂️ Step 5: Prune and Support for Maximum Yield
Pinch off the first few flowers that appear—this directs energy to root and stem growth before fruiting. Once the plant is established (about 6 weeks), remove suckers (the small shoots growing in the leaf axils) to improve air circulation and prevent disease. Prune with clean, sharp scissors to avoid tearing stems.
Install a stake or cage at planting time to support the plant as it grows. Peppers can get top-heavy with fruit, and wind or rain can break stems. Tie the main stem to the support with soft plant ties every 4-6 inches up the stem. This keeps the plant upright and productive while preventing damage.
Tips & tricks for thriving container-grown bell peppers
Here's what I've learned after years of growing peppers in containers—and how to avoid the mistakes that ruin harvests.
Container Depth Matters: While 5-gallon containers work, I've found that adding a 1-2 inch layer of expanded shale or coconut coir beneath the gravel creates an even more effective drainage system. This prevents the dreaded root rot that can creep up when containers sit in standing water. For terra cotta pots, I double the 24-hour soaking time to 48 hours in particularly dry climates—this ensures they don't dry out too quickly during hot afternoons.
Soil Temperature Secret: The 70-85°F soil temperature range is critical, but I've discovered that placing containers on black plastic mulch raises soil temps by 5-10°F on sunny days. This is especially helpful if you're growing in cooler microclimates. If you notice flowers dropping when temps dip below 60°F, move containers to a warmer location immediately—they'll recover within 24 hours if the cold spell is brief.
Fertilizer Timing: The 2-3 week feeding schedule works, but I've found that switching to the high-phosphorus fertilizer as soon as buds appear (not just when flowers open) gives peppers a noticeable boost. I also mix in 1 tablespoon of Epsom salt with each feeding—this magnesium boost prevents yellowing leaves and improves fruit quality. The key is consistency: never skip a feeding once you start the high-phosphorus phase.
Pruning Precision: When pruning suckers in Step 5, I make the cut just above the leaf axil where the sucker emerges. This prevents tearing and allows the plant to heal faster. For established plants, I prune suckers every 7-10 days during peak growing season—this keeps air circulation optimal and prevents disease buildup in the dense foliage.
Pro Tips for Growing Bell Pepper Plants In Containers
- Here's what I've learned after years of growing peppers in containers—and how to avoid the mistakes that ruin harvests.
- Container Depth Matters: While 5-gallon containers work, I've found that adding a 1-2 inch layer of expanded shale or...
- Soil Temperature Secret: The 70-85°F soil temperature range is critical, but I've discovered that placing containers ...
Frequently asked questions
Got questions about container-grown bell peppers? You’re not alone! Here are answers to the most common concerns to help you grow like a pro:
What’s the best container size for bell peppers?
Opt for at least a 5-gallon container (18+ inches deep) to give roots room to spread. Smaller pots (like 3-gallon) work for dwarf varieties but may limit yield. Ensure drainage holes are present to prevent soggy soil—bell peppers hate wet feet!
How long does it take for bell peppers to grow in containers?
From seed, expect 60–90 days to harvest, depending on the variety. Transplants (from nurseries) may fruit in 45–60 days. Patience is key—container-grown peppers mature slower than in-ground plants, but proper sunlight (6+ hours/day) and warmth speed things up!
Can I grow bell peppers in containers without a greenhouse?
Start seeds indoors 8–10 weeks before last frost or buy transplants. Move containers outdoors after nighttime temps stay above 50°F (10°C). Use a heat mat or move pots indoors at night if needed. Harden off plants gradually to avoid shock.
Why are my container-grown bell peppers turning yellow or dropping?
Yellowing leaves often signal overwatering, nutrient deficiency, or pests. Check soil moisture (top inch should dry out) and fertilize with a balanced 10-10-10 or tomato/vegetable feed every 2–3 weeks. Spider mites or aphids? Spray with neem oil or insecticidal soap. Drop-off can also mean blossom-end rot—boost calcium with crushed eggshells!
What’s the easiest bell pepper variety for containers?
Choose compact or dwarf varieties like:
- ‘Patio Princess’ (bushy, 24" tall, great for 5-gallon pots)
- ‘Jupiter’ (disease-resistant, 36" tall)
- ‘Snackable’ (mini peppers, perfect for 3-gallon pots)
Wrapping up and next steps
Growing bell peppers in containers is a rewarding way to enjoy fresh, homegrown produce—even in small spaces! With the right compact varieties, proper container setup, and a little care, you’ll be harvesting vibrant peppers in no time.
Whether you’re a beginner or a seasoned gardener, this method makes it easy to grow flavorful, nutrient-packed veggies right on your balcony or patio.
Ready to get started? Pick your favorite pepper variety, grab your containers, and dive in—your taste buds (and plants!) will thank you. 🌱✨