
Planting
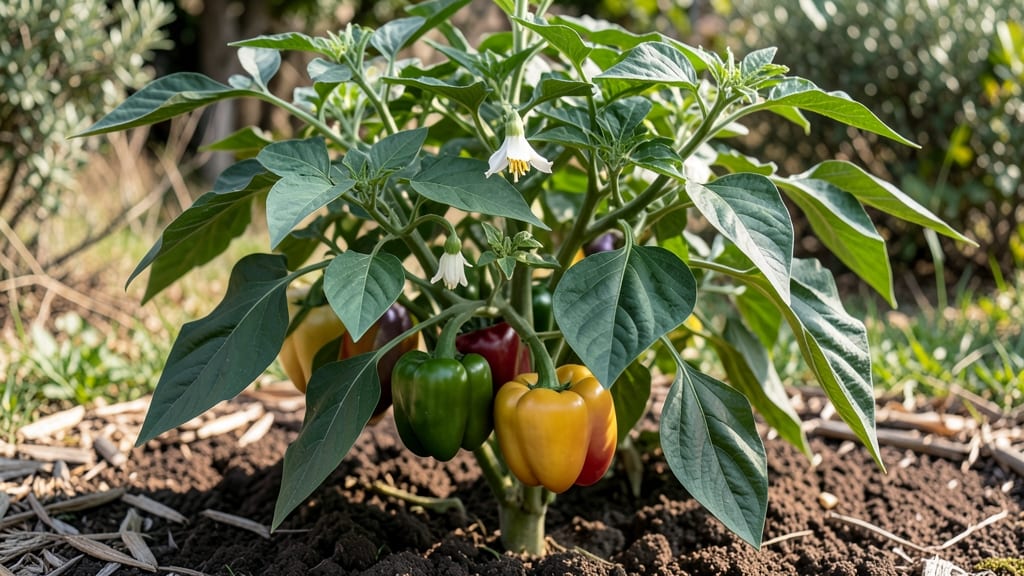
Tracking bell pepper plant stages through pictures is how I finally grew 12 perfect peppers from a single seedling last summer—no guesswork, just visual milestones. 🌱 The first stage starts with those tiny sprouts poking through soil in 7-14 days, while the final stage reveals glossy fruits turning from green to red, yellow, or purple depending on the variety.
Each phase has its own care secrets that make the difference between a handful of peppers and a garden overflowing with them.
What makes this timeline special is how color clues reveal ripeness—green peppers are immature, but once they shift to their mature hue, flavor peaks dramatically.
You’ll need 6-8 hours of sunlight daily, well-draining soil, and consistent moisture (about 1 inch per week), but the real game-changer is spacing: give plants 18-24 inches apart to prevent crowding and disease.
I learned the hard way that packed plants struggle to breathe, leading to blossom-end rot and stunted growth.
By the flowering stage, you’ll see white or purple blooms that eventually turn into tiny peppers—this is where hand-pollination helps if bees are scarce. Prune suckers (those little shoots in the joint) to focus energy on fruit production, and watch for pests like aphids hiding under leaves.
The payoff comes when those first mature peppers appear, plump and vibrant, ready to harvest within 60-90 days after transplanting.
This method works for all bell pepper varieties, from classic green to sweet red or spicy jalapeño types. Whether you’re growing in containers or garden beds, the same stages apply—just adjust spacing for smaller pots.
The key is patience: rushing harvests means missing peak flavor, but timing it right gives you homegrown peppers that outshine store-bought every time.
📚 In This Guide
- What you need
- Instructions
- Tips and common mistakes
- Wrapping up and next steps
What you need
- ● Seeds: Bell pepper seeds (choose your favorite variety—red, yellow, green, or purple!)
- ● Containers: Seed trays or small pots (3-4 inches deep) with drainage holes
- ● Potting Mix: High-quality seed-starting mix (sterile and well-draining)
- ● Fertilizer: Balanced, water-soluble fertilizer (5-10-5 or 10-10-10 ratio)
- ● Watering Can or Spray Bottle: With a gentle spray nozzle for seedlings
- ● Grow Lights or Sunny Window: A south-facing window or LED grow lights (12-16 hours/day for seedlings)
- ● Transplant Pots or Garden Space: Larger pots (5-gallon minimum) or a garden bed with full sun (6+ hours/day)
- ● Mulch: Organic mulch (straw, grass clippings, or shredded leaves) to retain moisture
- ● Hand Trowel: For transplanting seedlings
- ● Pruning Shears: To trim dead leaves or encourage bushier growth
- ○ Support Stakes or Cages: For indeterminate varieties (optional but helpful)
- ● pH Test Kit: To monitor soil pH (ideal range: 6.0-6.8)
- ● Plant Markers: To label varieties and track growth stages
- ○ Compost or Worm Castings: For extra nutrients (optional boost)
- ● Row Covers or Cloche: For early-season frost protection (if needed)
Understanding bell pepper plant stages: a visual growth timeline
Here's how to track your bell pepper's development from sprout to harvest—using color and structure as your guide.
🌱 Step 1: Germination and Seedling Stage (0-3 Weeks)
The first true leaves appear 10-14 days after sowing, signaling the end of germination. These initial leaves are round and smooth-edged, called cotyledons, and look nothing like mature pepper foliage. You'll notice them unfurling in pairs, each leaf slightly larger than the last.
At this stage, focus on keeping soil consistently moist but not soggy—top inch dry to touch is your target. Place seedlings under grow lights 2-3 inches away for 14-16 hours daily. Leggy seedlings (stems stretching toward light) mean your lights are too far away—move them closer immediately.
🌿 Step 2: Vegetative Growth (3-6 Weeks)
True pepper leaves emerge 3-4 weeks after germination, identifiable by their serrated edges and more complex shapes. These leaves are your first clue that the plant is transitioning from seedling to mature growth. You'll see them appear in clusters at leaf nodes, with each new leaf slightly larger than the previous.
This is when you'll notice the first flower buds forming at the leaf axils (where leaves meet stems). Don't remove them yet—even if you're not saving seeds, these early flowers help the plant establish its growth pattern. Maintain 70-80°F soil temperatures and 12+ hours of light daily to prevent stunted growth.
☀️ Step 3: Flowering and Fruit Set (6-8 Weeks)
The flowering stage begins when you see white or purple blossoms opening along the plant's main stem and branches. These flowers typically appear in clusters of 2-4 and only last 24-48 hours before wilting. Successful pollination occurs when you notice small green peppers forming 7-14 days after flowers appear.
Here's the thing—bell peppers are self-pollinating, but gentle shaking of the plant or a soft brush can increase fruit set. Watch for color changes: green peppers start as pale yellow-green, then darken to the classic bell pepper green as they mature. This stage requires full sun (6+ hours daily) and regular watering at the base to prevent blossom-end rot.
🌶️ Step 4: Fruit Maturation (8-12 Weeks)
Color changes mark the final stages of ripeness. Green bell peppers remain their signature shade until fully mature, but other varieties show dramatic color shifts: yellow, orange, red, or purple. For example, red bell peppers start green, then turn yellow, and finally deep red as they ripen—this process takes 60-80 days from fruit set.
Harvest when peppers reach their mature size and color, before they become soft or wrinkled. The skin should be firm and glossy, not dull. For maximum flavor, let peppers ripen fully on the plant—unripe peppers contain less sugar and more acid. Use clean pruners to cut stems, leaving ½ inch of stem attached to preserve quality.
Tips & tricks for tracking bell pepper growth stages
Mastering the visual cues of bell pepper development transforms guesswork into confident gardening. Here's how to maximize your plant's potential at each stage.
Seedling Stage Insight: The 10-14 day window for cotyledon emergence is your first critical milestone. I've learned to check for these round, smooth-edged leaves daily—when they appear, you know germination is complete. For optimal light exposure, position your grow lights 2-3 inches above seedlings and adjust immediately if stems stretch toward light (a sign they're reaching for more illumination). This prevents the "leggy" syndrome that weakens young plants.
Flowering Stage Strategy: Those delicate 24-48 hour blossoms are your window for pollination success. I've found that gently tapping the plant's main stem with a soft brush in the morning increases fruit set dramatically. Watch for the pale yellow-green transition to classic bell pepper green—this color shift indicates successful pollination. The 7-14 day window after flowering is when you'll first spot tiny peppers forming at leaf axils.
Ripeness Color Clues: For red bell pepper varieties, the 60-80 day maturation process from fruit set reveals nature's color palette. I track ripening by observing the gradual shift from green to yellow, then deep red—each color represents increasing sweetness. Harvest when peppers reach maximum size and color, before they develop soft spots. The firm, glossy skin is your final quality check before cutting stems with clean pruners.
Environmental Optimization: Maintaining that 70-80°F soil temperature range during vegetative growth (3-6 weeks) prevents stunted development. I've had success using a soil thermometer to monitor temperatures—especially important in containers where soil heats up faster. For flowering stages, ensure full sun exposure (6+ hours daily) by rotating plants weekly to prevent uneven growth patterns.
Pro Tips for Bell Pepper Plant Stages Pictures
- Mastering the visual cues of bell pepper development transforms guesswork into confident gardening.
- Seedling Stage Insight: The 10-14 day window for cotyledon emergence is your first critical milestone.
- Flowering Stage Strategy: Those delicate 24-48 hour blossoms are your window for pollination success.
Frequently asked questions
Got questions about growing bell peppers? You’re not alone! Here are answers to the most common queries about bell pepper plant stages, from seedlings to harvest—plus troubleshooting tips to keep your plants thriving.
How long does it take for a bell pepper plant to go from seed to harvest?
Most bell pepper varieties take 60–90 days from transplanting (or 90–120 days from seed) to reach maturity. Warmth and sunlight speed up growth—aim for 70–85°F (21–29°C) days for optimal ripening. Patience pays off with sweet, vibrant peppers!
Why are my bell peppers turning yellow or white before they ripen?
Yellowing or white peppers can signal stress—common causes include underwatering, extreme heat, or poor pollination. Ensure plants get 1–1.5 inches of water weekly and hand-pollinate flowers (gently shake them) if indoors. If peppers stay small, they may need more sunlight (6+ hours daily).
Can I harvest bell peppers before they turn red/green?
Bell peppers are edible at any stage—green (unripe), yellow, orange, or red. Harvest green peppers for a milder taste, or wait for red/orange for sweeter, deeper flavor. Use scissors to snip stems to avoid damaging the plant. Pro tip: Harvest regularly to encourage more production!
What’s the best temperature for bell pepper plants at each growth stage?
| Stage | Ideal Temperature (°F/°C) | Notes |
|---|---|---|
| Seedlings | 60–70°F (15–21°C) | Keep warm but avoid heat stress (above 85°F/29°C stunts growth). |
| Vegetative Growth | 70–85°F (21–29°C) | Bright light + consistent moisture = strong plants. |
| Fruiting | 75–85°F (24–29°C) | Cool nights (below 55°F/13°C) slow ripening. |
What can I do if my bell pepper plant stops producing flowers?
Lack of flowers? Check these fixes:
- Light: Move to a sunniest spot (south-facing window or grow lights).
- Nutrients: Feed with low-nitrogen, high-phosphorus fertilizer (e.g., 5-10-10) to boost blooms.
- Stress: Avoid overwatering (root rot) or sudden temperature swings.
- Pollination: Gently tap flowers with a paintbrush if indoors.
If the issue persists, your plant may need more time—some varieties take longer to mature.
Wrapping up and next steps
From tiny seedlings to vibrant, ripe peppers, understanding each stage of your bell pepper plant’s growth makes the journey rewarding! 🌱 With the right care—sunlight, soil, and patience—you’ll enjoy a bountiful harvest in no time.
Whether you’re a beginner or a seasoned gardener, every stage is a step closer to fresh, flavorful peppers.
Ready to plant your seeds or expand your garden? Start by marking your calendar for the next planting season and gather your supplies—your green thumb is about to shine! 🌟