
Container Gardens
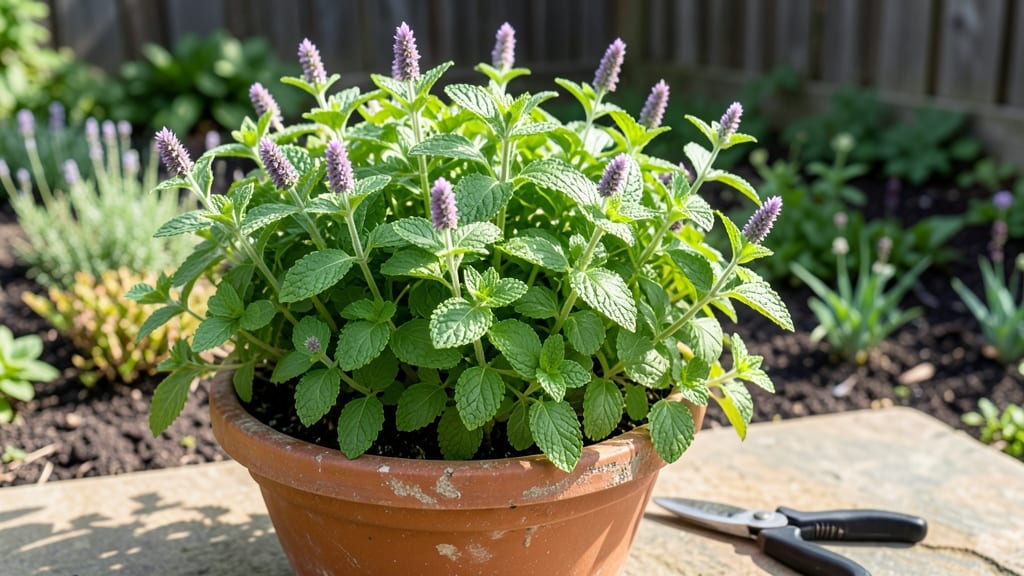
A potted peppermint plant can turn any windowsill into a fragrant oasis—no yard required. 🌿 I’ve grown mine for years, and the secret to keeping it lush and productive lies in the right container, soil, and a few simple care habits that prevent it from bolting or flopping over.
The key is well-draining soil mixed with compost (think 60% potting mix, 40% organic matter) and a container with drainage holes—no soggy roots here. Peppermint thrives in morning sun and afternoon shade, making it perfect for indoor spots near a bright window.
Overwatering is the #1 killer, so let the top inch dry out between waterings. By late summer, your plant will reward you with vibrant purple flowers and an intoxicating scent that repels pests naturally.
Snip leaves as needed for teas, cocktails, or just to enjoy the aroma—it’s the ultimate low-maintenance herb that keeps giving. This method works for small apartments, balconies, or even kitchen counters. Once you master the basics, you’ll never buy peppermint again—just propagate new pots from cuttings whenever you want.
📚 In This Guide
- What you need
- Instructions
- Tips and common mistakes
- Wrapping up and next steps
What you need
- ● Peppermint plant: 1 healthy cutting (4–6 inches long) or a nursery-grown potted plant (ensure it’s labeled as Mentha piperita).
- ● Container: 1 pot with drainage holes (minimum 10–12 inches in diameter for a single plant; larger for multiple stems). Terracotta or fabric pots work best.
- ● Potting mix: 1 bag of well-draining, peat-based soil (or a blend of 50% potting soil + 50% perlite/sand to prevent root rot). Avoid garden soil—it compacts and suffocates roots!
- ● Watering can or spray bottle: 1 with a gentle shower nozzle for even moisture distribution.
- ● Pruning shears: 1 pair of sterilized, sharp shears (or clean scissors in a pinch).
- ○ Fertilizer (optional but recommended): 1 balanced liquid fertilizer (e.g., 10-10-10) or
- ● 1 slow-release granular fertilizer (like osmocote) mixed into the soil.
- ● Gloves: 1 pair of gardening gloves (peppermint oils can irritate skin!).
- ● Mulch: 2–3 inches of organic mulch (e.g., straw or shredded leaves) to retain moisture.
- ○ Support stake (optional): 1 small bamboo or metal stake if your peppermint grows tall and leggy.
- ○ Honey or cinnamon (optional): A dash of honey in water or cinnamon powder to deter fungal diseases.
- ● Pest control: Neem oil spray (1 tsp neem oil + 1 quart water) if aphids or spider mites appear.
- ○ Second pot (optional): 1 smaller propagation pot if you plan to grow new plants from cuttings.
- ● Sunlight: A spot with 4–6 hours of direct sunlight daily (partial shade works in hot climates).
- ● Water access: A sink or hose nearby for regular watering.
- ● Patience: Peppermint grows aggressively—be ready to prune often!
- ● Outdoor space (if propagating): A shady, moist area to root cuttings before potting.
How to grow a thriving potted peppermint plant
Here’s my go-to method for keeping peppermint lush, fragrant, and contained—no sprawling escapes or fussy care.
🪴 Step 1: Choose the Right Pot and Soil
Peppermint thrives in 6-8 inch pots with drainage holes—unglazed terra cotta works best because it wicks away excess moisture. Avoid plastic, which traps humidity and invites rot. I always use well-draining potting mix (never garden soil) blended with 20% perlite to prevent compaction. The mix should feel light and airy when squeezed—like a damp sponge, not a mud ball.
Fill the pot to 1 inch below the rim and tap gently to settle the soil. Leave room at the top to avoid overflow when watering. Peppermint’s roots spread aggressively, so if you plan to keep it long-term, consider a 10-12 inch pot—your future self will thank you when pruning sessions stay manageable.
🌱 Step 2: Plant and Water for Initial Establishment
Dig a hole twice as wide as the root ball but no deeper—peppermint dislikes being buried too deeply. Gently loosen the roots if they’re circling in the nursery pot, then place the plant so the top of the root ball sits ½ inch below the soil line. This prevents stem rot while keeping the plant stable.
Water deeply until moisture runs from the drainage holes, then let it drain completely. Peppermint hates soggy feet but needs consistent moisture—think of it like a thirsty traveler who can’t hold water. After planting, keep the soil evenly moist (not soggy) for the first 2 weeks. You’ll know it’s right when the top inch feels damp but not wet.
☀️ Step 3: Position for Light and Airflow
Peppermint needs 4-6 hours of morning sun and dappled afternoon shade—direct afternoon sun scorches the leaves. A north- or east-facing windowsill works perfectly, or place it 3-4 feet from a south-facing window. If outdoors, choose a spot with partial shade and protection from strong winds, which can stress the plant.
Airflow is critical—peppermint’s leaves are prone to fungal issues in stagnant air. Place a small fan on low speed nearby (just enough to rustle the leaves) or position the pot where breezes naturally pass through. You’ll notice healthier, glossier leaves within a week of proper airflow.
✂️ Step 4: Prune for Bushiness and Fragrance
Pinch back the top set of leaves when the plant reaches 6 inches tall to encourage branching. This is where the magic happens—more stems mean more fragrant foliage and a fuller pot. Use clean, sharp scissors to snip just above a leaf node (the bump where leaves attach). Avoid tearing the stems, or you’ll invite disease.
Harvest young leaves (the tender ones near the growing tips) regularly to stimulate new growth. Never take more than ⅓ of the plant at once—peppermint recovers quickly, but aggressive pruning stresses it. The best time to harvest is early morning, when essential oils are most concentrated. Store cuttings in a loosely sealed container in the fridge for up to a week.
💧 Step 5: Winter Care for Year-Round Growth
Peppermint stays green year-round, but winter slows its growth. Reduce watering to every 7-10 days (when the top 1 inch of soil feels dry) and move the pot away from cold drafts or heat vents. If temperatures drop below 40°F, bring it indoors near a bright window. Avoid fertilizing during dormancy—peppermint’s roots need a rest to rebound in spring.
In late winter, trim back any leggy growth and add a light layer of compost to refresh the soil. Peppermint is heavy feeder, so a balanced 10-10-10 fertilizer (diluted to half strength) in early spring jumpstarts fresh growth. Watch for new shoots emerging from the base—this is your cue that the plant is waking up.
Tips & tricks for perfect potted peppermint care
Here's what I've learned after years of growing peppermint without the usual headaches—these tricks keep your plant thriving with minimal fuss.
Soil Mix Secret: The 20% perlite blend in Step 1 isn't just about drainage—it creates tiny air pockets that prevent root rot while still holding enough moisture. I've had plants last for years using this exact ratio, but if you're in a humid climate, you can increase perlite to 30% to prevent fungal issues. The key is that your soil should crumble easily when dry, not stay in clumps.
Root Ball Placement: That ½-inch depth adjustment in Step 2 might seem minor, but it's crucial. Peppermint roots are sensitive to being buried too deep, which can cause stem rot. I've seen plants saved by simply adjusting this one detail—just make sure the soil line sits slightly above the original root ball level. This small adjustment prevents one of the most common peppermint failures.
Watering Rhythm: The "evenly moist" guideline in Step 2 is your best friend. I test soil moisture by sticking my finger 1 inch down—if it feels damp but not wet, that's perfect. Overwatering is the #1 killer of potted peppermint, but underwatering causes leaf scorch. The top inch drying out between waterings gives you that perfect balance. In winter, when growth slows, you'll naturally water less as the plant tells you what it needs.
Light Positioning: That 4-6 hours of morning sun in Step 3 is non-negotiable for flavor development. I've noticed that plants getting less than 4 hours tend to develop milder aromas. For indoor growers, rotate your pot every few weeks so all sides get equal light exposure. This prevents lopsided growth and ensures your plant stays bushy and fragrant from all directions.
Pro Tips for Potted Peppermint Plant
- Here's what I've learned after years of growing peppermint without the usual headaches—these tricks keep your plant thriving with minimal fuss.
- Soil Mix Secret: The 20% perlite blend in Step 1 isn't just about drainage—it creates tiny air pockets that prevent root rot while still holding enough moisture.
- Root Ball Placement: That ½-inch depth adjustment in Step 2 might seem minor, but it's crucial.
Frequently asked questions
Got questions about keeping your potted peppermint plant thriving? You’re not alone! Here are some of the most common queries—and their simple solutions—to help you enjoy that fresh, minty aroma year-round.
How often should I water my potted peppermint plant?
Peppermint loves moisture but hates soggy roots. Water when the top 1–2 inches of soil feel dry—usually every 2–3 days in warm weather or weekly in cooler months. Ensure the pot has drainage holes to prevent root rot. Pro tip: Mist the leaves occasionally to boost humidity!
Do I need to prune my peppermint plant, and when?
Pruning keeps your peppermint lush and prevents it from becoming leggy. Trim back overgrown stems by ⅓ in early spring and again after flowering. Use clean scissors to avoid disease. Bonus: Harvest leaves during pruning for fresh tea or garnishes!
Can I grow peppermint indoors year-round?
Peppermint thrives indoors near a sunny window (6+ hours of light daily). If growth slows, supplement with a grow light. Just watch for pests like spider mites—isolate the plant if you spot them and treat with neem oil.
Why is my peppermint plant turning yellow?
Yellow leaves often signal overwatering or poor drainage. Let the soil dry slightly between waterings and check for root rot. If the pot lacks drainage, repot into a container with holes. Quick fix: Trim yellowed leaves to redirect energy to healthy growth.
What can I do with peppermint leaves besides tea?
Peppermint is versatile! Crush leaves for natural bug repellent, infuse them in homemade soap, or add to cocktails and desserts. Dried leaves work too—just hang bundles upside down in a dark, dry place for 1–2 weeks.
Wrapping up and next steps
Growing a potted peppermint plant is a rewarding way to enjoy year-round fragrance with minimal effort—perfect for busy gardeners or small-space enthusiasts! 🌿 With the right soil, sunlight, and occasional pruning, you’ll have a lush, aromatic plant that thrives in containers.
Whether you’re sipping mint tea, freshening up your space, or sharing cuttings with friends, this versatile herb is a must-have for any home.
Ready to dive in? Start with a healthy potted plant, follow the care tips, and watch your mint flourish! 🌱 For extra inspiration, explore creative ways to use your harvest—from cocktails to homemade remedies. Happy gardening!