
Companion Plants
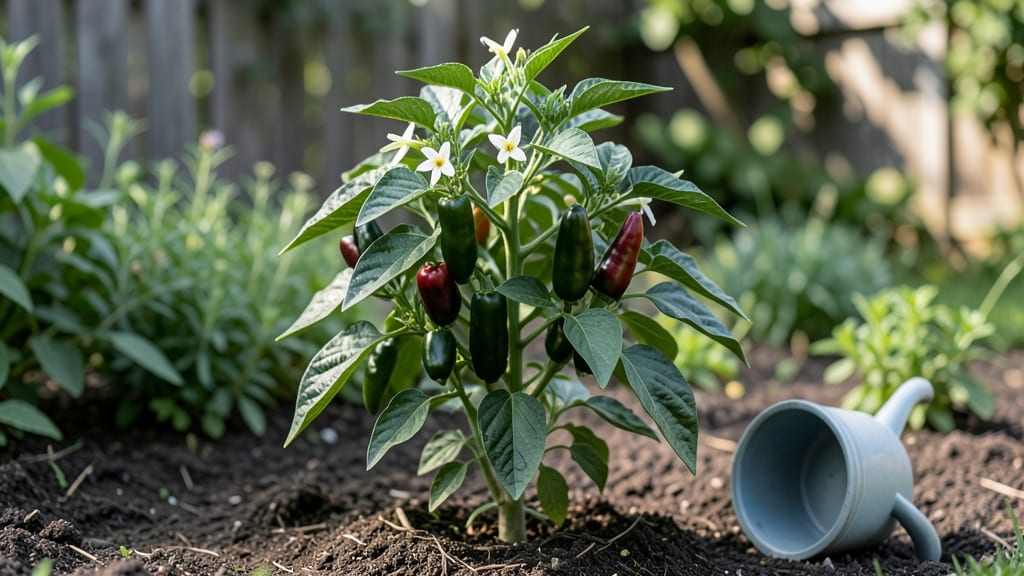
Growing ancho chile pepper plants from seed means your kitchen will smell like sun-dried magic by summer. 🌶️ These aren’t just peppers—they’re the dried, smoky, slightly sweet anchors of moles and salsas. My first harvest taught me that patience and heat are the real ingredients, not just soil and water.
Start with well-draining soil that’s warm (70°F or higher) and full sun—at least 6-8 hours daily. Too much moisture? Roots rot. Too little? Peppers turn bitter.
I’ve found that planting in black plastic pots speeds up soil warming in cool springs, and mulching with straw keeps moisture steady without soggy soil. By late summer, you’ll be harvesting deep green peppers that turn red when ripe—then dry them for that signature ancho flavor.
The first year’s yield might be small, but each dried pepper packs 10x the flavor of store-bought. Save seeds from your best ones for next season’s heirloom stash. Works in zones 9-11, but container gardeners in cooler areas can grow them successfully too. Just bring pots indoors before frost.
Here’s how to turn seeds into sun-ripened treasures!
📚 In This Guide
- What you need
- Instructions
- Tips and common mistakes
- Wrapping up and next steps
What you need
- ● Ancho chile seeds: 5–10 seeds (or 2–3 plants if starting from seedlings). Choose heirloom varieties like Poblano (which dries into anchos) for best results.
- ● Containers or garden bed: 5–10 gallon pots (1 per plant) with drainage holes, or
- ● A sunny garden spot (6+ hours of sunlight daily) with well-draining soil (pH 6.0–7.0).
- ● Potting mix: 1–2 bags of high-quality, organic pepper-specific mix (or blend 60% potting soil + 40% compost).
- ● Fertilizer: Balanced organic fertilizer (e.g., 5-5-5) at planting, and
- ● Low-nitrogen fertilizer (e.g., 2-3-1) during fruiting (every 3–4 weeks).
- ● Support: 3–4 ft bamboo stakes or cages (1 per plant) to prevent toppling.
- ● Hand trowel and pruners (sterilized with rubbing alcohol).
- ● Watering can or hose with a gentle spray nozzle (avoid wetting leaves).
- ● Mulch (straw or shredded leaves) to retain moisture and deter weeds.
- ○ Row cover (optional, for early-season frost protection).
- ● Drying racks or mesh bags (for post-harvest drying—see Drying Secrets).
Step-by-step instructions for growing ancho chile pepper plants
Here’s the foolproof method I’ve used to grow bold, flavorful ancho peppers—from seed to drying—with minimal fuss.
🌱 Step 1: Start Seeds Indoors 8-10 Weeks Before Last Frost
Ancho peppers need a long growing season, so begin indoors with the seed-starting mix and biodegradable pots (2-3 inches deep). Fill each pot with moistened mix, leaving ½ inch from the rim. Plant 2-3 seeds per pot at a depth of ¼ inch—they’re tiny, so use a toothpick for precision. Cover lightly with extra mix and mist gently until the surface is damp but not soggy.
Place pots in a warm spot (75-85°F) under a grow light (14-16 hours daily). A seedling heat mat speeds germination, which takes 7-14 days. Keep the soil consistently moist—never soggy—until first true leaves appear. This is the moment you’ll know it worked: tiny, rounded leaves replacing the initial seedling sprouts.
☀️ Step 2: Harden Off and Transplant After Frost
Two weeks before your last frost date, start hardening off seedlings. Move them outside to a sheltered spot for 1-2 hours the first day, gradually increasing time over 10-14 days. Watch for wilting or yellowing—if this happens, they’re not ready yet. Ancho peppers thrive in full sun (6+ hours daily), so choose a warm, sunny garden bed or large container (5-gallon minimum).
Transplant after soil reaches 60°F and all frost risk has passed. Bury seedlings deeper than the pot—up to the first set of leaves—to encourage strong root growth. Space plants 18-24 inches apart in rows 2 feet apart for airflow. Water deeply at transplanting to settle the soil around roots, and mulch with straw or grass clippings to retain moisture.
💧 Step 3: Water Deeply and Fertilize for Fruit Production
Ancho peppers hate wet feet but need consistent moisture. Water deeply 1-2 times weekly, aiming for 1 inch of water per week. Let the top 2 inches of soil dry between waterings—this prevents blossom-end rot and fungal diseases. Use a drip irrigation system or water at the base to avoid wetting leaves, which attracts pests.
Feed plants every 3-4 weeks with a balanced organic fertilizer (10-10-10) once flowers appear. You’ll know it’s working when you see bright yellow blooms followed by pepper pods forming. Prune suckers (the shoots in the V of the main stem) to direct energy into fruit production. Harvest when pods turn deep red—this is your cue for drying.
⏰ Step 4: Harvest and Dry Ancho Peppers Properly
Pick peppers when fully ripe (deep red, about 3-4 inches long). Use pruning shears to avoid damaging the plant. Spread peppers on a wire rack in a well-ventilated, dry area (70-80°F) for 2-4 weeks. They’re ready when dry, leathery, and shriveled—now they’re anchos! Store dried peppers in an airtight container away from light for up to 1 year.
Real talk: If peppers turn yellow or drop prematurely, they’re thirsty or too hot. Adjust watering and provide afternoon shade in extreme heat. The drying process is the secret to flavor—rush it, and you’ll end up with bitter, tough peppers. Patience here pays off in bold, smoky depth for your dishes.
Tips & tricks for perfect ancho chile pepper plants
These simple strategies will help you grow bold, flavorful ancho peppers from seed to harvest with confidence.
Seed-Planting Precision: When planting those tiny ancho seeds at ¼ inch depth, use a toothpick to make precise holes—it's the only way to avoid burying them too deep. I learned this the hard way after struggling with uneven germination. Also, don't overcrowd your pots with more than 2-3 seeds per pot—they'll compete for nutrients and light, leaving you with weak seedlings.
Germination Environment: The 75-85°F temperature range for germination is non-negotiable. If your home runs cooler, place pots on a seedling heat mat or near a sunny window. I keep a small thermometer near my seed trays to monitor temperature—it's worth the investment. The 14-16 hours of grow light daily is also crucial; regular household lighting won't cut it for these sun-loving plants.
Transplanting Strategy: When transplanting, bury seedlings deeper than their pots—up to the first set of leaves. This encourages strong root growth and helps stabilize the plants in their new home. I like to water deeply at this stage to help settle the soil around those newly exposed roots. The 18-24 inch spacing is important for airflow, which prevents fungal diseases that can ruin your harvest.
Drying Technique: The 2-4 week drying process at 70-80°F is where the magic happens for authentic flavor. I use a small fan on low setting to maintain even airflow around my drying rack. This prevents mold while ensuring consistent drying. When peppers are properly dried, they'll be leathery and shriveled—now you're ready to store them for up to a year in an airtight container.
Pro Tips for Ancho Chile Pepper Plants
- These simple strategies will help you grow bold, flavorful ancho peppers from seed to harvest with confidence.
- Seed-Planting Precision: When planting those tiny ancho seeds at ¼ inch depth, use a toothpick to make precise holes—...
- Germination Environment: The 75-85°F temperature range for germination is non-negotiable. If your home runs cooler, p...
Frequently asked questions
Got questions about growing and using ancho chile pepper plants? You’re not alone! Here are answers to the most common queries to help you cultivate and enjoy these fiery beauties like a pro.
How long does it take for ancho chile plants to produce fruit?
Ancho chiles (dried poblano peppers) typically take 90–120 days from transplanting to harvest when grown from seed. If you start with seedlings, expect fruit in 60–80 days. Patience is key—these peppers love warm weather and need time to mature!
Can ancho chile plants survive frost?
Nope! Ancho chile plants are tropical and cannot tolerate frost. They thrive in temperatures between 70–85°F (21–29°C). If frost threatens, harvest peppers early or bring potted plants indoors. Sadly, frost will kill the plant, but you can still dry the peppers for ancho powder!
What are the best companion plants for ancho chile peppers?
Ancho chiles love basil, marigolds, and onions as companions—they repel pests and improve flavor. Avoid planting near fennel or beans, as they can stunt growth. A three-sisters garden (corn, beans, squash) works well too!
Why are my ancho chile peppers turning yellow or dropping?
Yellowing or dropping peppers usually signal underwatering, overwatering, or nutrient deficiencies. Check soil moisture—it should stay evenly damp but not soggy. Yellow leaves? Add compost or balanced fertilizer. Dropping peppers may also mean heat stress—provide afternoon shade in extreme heat.
Can I grow ancho chiles in containers, and what size pot do I need?
Ancho chiles thrive in 5-gallon pots or larger with drainage holes. Use a well-draining potting mix and place pots in full sun (6+ hours/day). Just ensure the pot is at least 12–18 inches deep—these plants have strong roots!
How do I tell when ancho chiles are ready to harvest?
Harvest when peppers are fully green and firm (for fresh poblano use) or deep red and slightly wrinkled (for drying into ancho). For maximum flavor, wait until they’re bright red and about 4–6 inches long. Use pruning shears to avoid damaging the plant!
Wrapping up and next steps
Growing ancho chile pepper plants from seed to dried harvest is a rewarding journey that brings bold flavors and vibrant colors to your kitchen! Whether you're a seasoned gardener or a curious beginner, these fiery friends thrive with the right care—sun, space, and patience.
Now that you’re armed with spicy secrets, it’s time to roll up your sleeves and plant those seeds! 🌱🔥
Ready to take the next step? Start small—try a few plants in pots or a sunny patch of soil—and experiment with drying techniques to perfect your homemade ancho peppers. Who knows? You might just inspire your friends (and your taste buds!) to join the adventure.